2023年12月30日
VSCodeでRISC-Vボードをデバッグその2 - Linuxマシン側の準備(Zephyr RTOS)
目次: Linux
前回はVisual Studio Code(以降VSCode)とSSH Remote Extensionを使ってLinuxマシンに接続するところまでを設定しました。
今回はその続き……の前に準備としてLinuxマシンだけを使って、
- OpenOCDを起動
- GDBで実行ファイルをロード&実行
- GDBでCUIデバッグする方法
を紹介します。
デバッグ対象: SiFive HiFive1ボード
デバッグ対象は何でも良いですがそう言われても困ると思うのでZephyr RTOSとSiFive HiFive1 Rev Bボードを使用します。Zephyr RTOSの開発環境セットアップとビルドは以前の日記(2023年12月27日の日記参照)で紹介しています。
以前の日記ではQEMU向けにビルドしましたが、今回は実ボードSiFive HiFive1 Rev B向けにビルドします。といってもほぼ同じです。下記のようにします。
Zephyrのビルド(west版)
$ west build -p always -b hifive1_revb samples/hello_world/
$ west flash
これでボードに実行ファイルが書き込まれて実行開始されるはずですが、これじゃ何だかわからない、中身をもう少し知りたい、という方のためにCMakeとGDBを使った手順を紹介します。
Zephyrのビルド(CMake版)
$ rm -r build
$ cmake -B build -G Ninja -DBOARD=hifive1_revb samples/hello_world
$ ninja -C build

$ ls build/zephyr
CMakeFiles           kernel                      zephyr.bin
arch                 lib                         zephyr.dts
boards               libzephyr.a                 zephyr.dts.d
cmake                linker.cmd                  zephyr.dts.pre
cmake_install.cmake  linker.cmd.dep              zephyr.elf    ★これがGDBなどで使う実行ファイル
drivers              linker_zephyr_pre0.cmd      zephyr.lst
dts.cmake            linker_zephyr_pre0.cmd.dep  zephyr.map
edt.pickle           misc                        zephyr.stat
include              runners.yaml                zephyr_final.map
isrList.bin          snippets_generated.cmake    zephyr_pre0.elf
isr_tables.c         soc                         zephyr_pre0.map
kconfig              subsys
ビルドに成功するとbuild/zephyr/zephyr.elfという実行ファイル(ELF形式)が生成されるはずです。
OpenOCDを起動
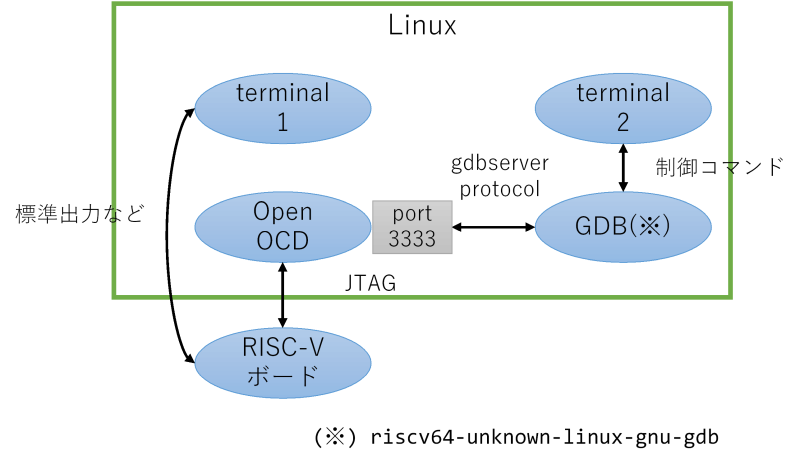
SiFive HiFive1ボードとLinuxマシンを以下の図のように接続しているとします。
端末を2つ用意し、1つ目の端末でOpenOCDを起動します。システムにインストールされているOpenOCDのバージョンによっては動かないかもしれません。OpenOCDのビルドについては以前の日記(2023年6月28日の日記参照)で紹介しています。
OpenOCDの起動(Linux単独版)
$ sudo openocd -c 'bindto 0.0.0.0' -f tcl/interface/jlink.cfg -f tcl/board/sifive-hifive1-revb.cfg

Open On-Chip Debugger 0.12.0+dev-01422-g1b0b07baa-dirty (2023-11-30-05:58)
Licensed under GNU GPL v2
For bug reports, read
        http://openocd.org/doc/doxygen/bugs.html
Warn : Interface already configured, ignoring
Info : J-Link OB-K22-SiFive compiled Nov 22 2019 12:57:38
Info : Hardware version: 1.00
Info : VTarget = 3.300 V
Info : clock speed 4000 kHz
Info : JTAG tap: riscv.cpu tap/device found: 0x20000913 (mfg: 0x489 (SiFive Inc)
, part: 0x0000, ver: 0x2)
Info : datacount=1 progbufsize=16
Info : Disabling abstract command reads from CSRs.
Info : Examined RISC-V core; found 1 harts
Info :  hart 0: XLEN=32, misa=0x40101105
Info : starting gdb server for riscv.cpu.0 on 3333
Info : Listening on port 3333 for gdb connections
Info : Found flash device 'issi is25lp032' (ID 0x0016609d)
Ready for Remote Connections
Info : Listening on port 6666 for tcl connections
Info : Listening on port 4444 for telnet connections
OpenOCDに指定しているtcl/interface/xxxx.cfgというファイルは、OpenOCDのソースコードに含まれています。GitでOpenOCDのソースコードを丸ごと持ってくるか、
OpenOCDのソースコードリポジトリ取得
$ git clone https://git.code.sf.net/p/openocd/code openocd-code
コードを眺めるだけならGitHubのミラー(GitHubへのリンク)が見やすいです。
- jlink.cfg(GitHubへのリンク)
- sifive-hifive1-revb.cfg(GitHubへのリンク)
必要なファイルだけ見たい人は上記のリンクからどうぞ。
GDBで実行ファイルをロード&実行
次に2つ目の端末にてGDBを起動します。Zephyr SDKへのパスを通すのをお忘れなく。パスの通し方は(2023年12月27日の日記参照)の「Zephyr開発環境への入り方」を参照してください。
GDBの起動(Linux単独版)
$ riscv64-zephyr-elf-gdb build/zephyr/zephyr.elf

(略)

For help, type "help".
Type "apropos word" to search for commands related to "word"...
Reading symbols from build/zephyr/zephyr.elf...

(gdb) target remote :3333

(gdb) monitor reset halt

(gdb) load

Loading section rom_start, size 0x18 lma 0x20010000
Loading section reset, size 0x6 lma 0x20010018
Loading section exceptions, size 0x146 lma 0x20010020
Loading section text, size 0x35a2 lma 0x20010168
Loading section initlevel, size 0x40 lma 0x2001370c
Loading section device_area, size 0x50 lma 0x2001374c
Loading section sw_isr_table, size 0x200 lma 0x2001379c
Loading section log_const_area, size 0x20 lma 0x2001399c
Loading section rodata, size 0x460 lma 0x200139bc
Loading section datas, size 0xdc lma 0x20013e1c
Loading section device_states, size 0x8 lma 0x20013ef8
Loading section .last_section, size 0x4 lma 0x20013f00
Start address 0x20010000, load size 16126
Transfer rate: 595 bytes/sec, 1343 bytes/write.

(gdb) continue
HiFive1のUARTからZephyrというかHello worldアプリのメッセージが出ていることを確認しましょう。
HiFive1のUART確認
$ pyserial-miniterm /dev/ttyACM0 115200

--- Miniterm on /dev/ttyACM0  115200,8,N,1 ---
--- Quit: Ctrl+] | Menu: Ctrl+T | Help: Ctrl+T followed by Ctrl+H ---
*** Booting Zephyr OS build zephyr-v3.4.0-1149-g2bf091f8af5b ***
Hello World! hifive1_revb
HiFive1は動作が遅いためかOpenOCD側に下記のような警告が何度か出ます。
OpenOCDの警告
JTAG tap: riscv.cpu tap/device found: 0x20000913 (mfg: 0x489 (SiFive Inc), part: 0x0000, ver: 0x2)
keep_alive() was not invoked in the 1000 ms timelimit. GDB alive packet not sent! (1497 ms). Workaround: increase "set remotetimeout" in GDB
動作に支障はないですが、警告に書いてあるworkaroundの通りset remotetimeout unlimitedとしても警告が出続けるのは若干気になりますね……。
GDBでCUIデバッグする方法
普通のLinuxアプリケーションをデバッグするときと同じように使えます。
GDB CUIによるデバッグ
(gdb) monitor reset halt

(gdb) d

Delete all breakpoints? (y or n) y

(gdb) hb main

Hardware assisted breakpoint 1 at 0x20010970: file zephyr/zephyr/samples/hello_world/src/main.c, line 11.

(gdb) c

Continuing.

Breakpoint 1, main () at zephyr/zephyr/samples/hello_world/src/main.c:11
11              printk("Hello World! %s\n", CONFIG_BOARD);
HiFive1はRAMが非常に少ないためXIP(Execution In Place)つまりフラッシュROM上のプログラムを直接実行します。そのためブレークポイントは自動的にハードウェア支援ブレークポイント(hbで使えるものと一緒)になります。ハードウェア支援ブレークポイントは設定可能な数に上限があるため、通常のブレークポイントと挙動が異なったり、エラーになったりすることがあります。
あと全体的に非常に遅いです。stepやnextを実行するとしばらく反応が返ってきません。例として使うには良くなかったかな……。
おまけ、リモートデバッグ
これだけだとwestの焼き直しで面白くないので、おまけとして遠隔地にあるボードを扱う方法をご紹介します。
繰り返しになりますがOpenOCDのビルドについては以前の日記(2023年6月28日の日記参照)で紹介しています。Raspberry Pi用のOpenOCDをビルドするときにご参照ください。
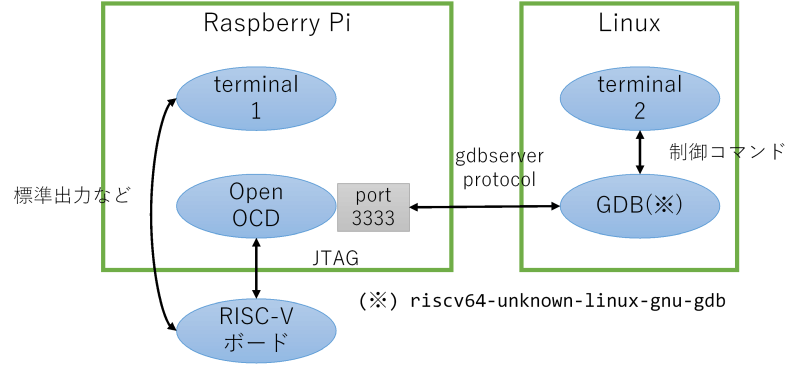
SiFive HiFive1ボードとRaspberry PiとLinuxマシンを以下の図のように接続しているとします。Linuxマシンもしくは、HiFive1ボードとRaspberry Piのペアがお互いに離れている状況を考えてもらうとわかりやすいかと思います。
例えばLinuxマシンを2階におき、Raspberry PiとHiFive1ボード(とLinuxマシンを操作するノートPCとか)を1階の机に置く、といったデバッグ環境が作れます。家と会社などでもアリです。
やることは基本的に同じです。Raspberry Pi側で1つ目の端末を起動し、OpenOCDを起動します。起動するコマンドも同じです。
OpenOCDの起動(LinuxとRasPiコンビ版)
#### Raspberry Pi側の端末

$ sudo openocd -c 'bindto 0.0.0.0' -f tcl/interface/jlink.cfg -f tcl/board/sifive-hifive1-revb.cfg

Open On-Chip Debugger 0.12.0+dev-01422-g1b0b07baa-dirty (2023-11-30-05:58)
Licensed under GNU GPL v2
For bug reports, read
        http://openocd.org/doc/doxygen/bugs.html
Warn : Interface already configured, ignoring
Info : J-Link OB-K22-SiFive compiled Nov 22 2019 12:57:38
Info : Hardware version: 1.00
Info : VTarget = 3.300 V
Info : clock speed 4000 kHz
Info : JTAG tap: riscv.cpu tap/device found: 0x20000913 (mfg: 0x489 (SiFive Inc)
, part: 0x0000, ver: 0x2)
Info : datacount=1 progbufsize=16
Info : Disabling abstract command reads from CSRs.
Info : Examined RISC-V core; found 1 harts
Info :  hart 0: XLEN=32, misa=0x40101105
Info : starting gdb server for riscv.cpu.0 on 3333
Info : Listening on port 3333 for gdb connections
Info : Found flash device 'issi is25lp032' (ID 0x0016609d)
Ready for Remote Connections
Info : Listening on port 6666 for tcl connections
Info : Listening on port 4444 for telnet connections
次にLinux側で2つ目の端末を起動し、GDBを起動します。異なるのはremote targetコマンドの部分のみです。Raspberry PiのIPアドレスが192.168.1.10だとします。
GDBの起動(LinuxとRasPiコンビ版)
#### Linuxマシン側の端末

$ riscv64-zephyr-elf-gdb build/zephyr/zephyr.elf

(略)

For help, type "help".
Type "apropos word" to search for commands related to "word"...
Reading symbols from build/zephyr/zephyr.elf...

(gdb) target remote 192.168.1.10:3333

(gdb) monitor reset halt

(gdb) load

Loading section rom_start, size 0x18 lma 0x20010000
Loading section reset, size 0x6 lma 0x20010018
Loading section exceptions, size 0x146 lma 0x20010020
Loading section text, size 0x35a2 lma 0x20010168
Loading section initlevel, size 0x40 lma 0x2001370c
Loading section device_area, size 0x50 lma 0x2001374c
Loading section sw_isr_table, size 0x200 lma 0x2001379c
Loading section log_const_area, size 0x20 lma 0x2001399c
Loading section rodata, size 0x460 lma 0x200139bc
Loading section datas, size 0xdc lma 0x20013e1c
Loading section device_states, size 0x8 lma 0x20013ef8
Loading section .last_section, size 0x4 lma 0x20013f00
Start address 0x20010000, load size 16126
Transfer rate: 595 bytes/sec, 1343 bytes/write.

(gdb) continue
GDBとOpenOCD間がTCP/IPで通信しているからできる技ですね。使ってみるとわかる便利さです。
コメント一覧
- コメントはありません。
 この記事にコメントする
| < | 2023 | > | ||||
| << | < | 12 | > | >> | ||
| 日 | 月 | 火 | 水 | 木 | 金 | 土 |
| - | - | - | - | - | 1 | 2 |
| 3 | 4 | 5 | 6 | 7 | 8 | 9 |
| 10 | 11 | 12 | 13 | 14 | 15 | 16 |
| 17 | 18 | 19 | 20 | 21 | 22 | 23 |
| 24 | 25 | 26 | 27 | 28 | 29 | 30 |
| 31 | - | - | - | - | - | - |
こんてんつ
 wiki
wiki Linux JM
 Java API
過去の日記
 2002年
2002年 2003年
2003年 2004年
2004年 2005年
2005年 2006年
2006年 2007年
2007年 2008年
2008年 2009年
2009年 2010年
2010年 2011年
2011年 2012年
2012年 2013年
2013年 2014年
2014年 2015年
2015年 2016年
2016年 2017年
2017年 2018年
2018年 2019年
2019年 2020年
2020年 2021年
2021年 2022年
2022年 2023年
2023年 2024年
2024年 2025年
2025年 過去日記について
その他の情報
 アクセス統計
 サーバ一覧
サーバ一覧 サイトの情報
合計:
本日:
 未来から過去へ表示(*)


