2024年1月1日
石川の大地震
鳥取4日目。2024年が明けました。今年もよろしくお願いいたします。
夕方、奥さんと外を散歩していたら風もないのに近所の家の窓がガタガタと10〜20秒?ほど揺れ続けました。何だ?と思う間に地震警報が発令され、能登半島で大地震があったことを知ったのでした。
地震の後のニュースでは(特にNHKの山内泉アナウンサーが顕著でした)逃げろ、高い場所に逃げろ、テレビなんか見てないで明るいうちに早く逃げろ!という切実な想いが伝わってきました。
ニュースは感情を煽らないのが通常です。しかし東日本大震災では避難を冷静に呼びかけたところ、津波の高さが想像できなかったのか避難が遅れて津波に巻き込まれて亡くなった人がたくさんいたそうです。
東日本大震災の悲しい教訓から、NHKは「今すぐ高いところに逃げること!」とやや感情的に呼びかけるようにした(「東日本大震災を思い出してください!」その時、ことばで命を守れるか。NHKアナウンサーたちの10年 - NHK)のだそうです。
NHKの取り組みは非常に良い取り組みだと思います。
コメント一覧
- コメントはありません。
 この記事にコメントする
2023年12月31日
VSCodeでRISC-Vボードをデバッグその3 - Linuxマシン側の準備(Akaria BSP)
目次: Linux
前回はLinuxマシンだけを使って、OpenOCDとGDBでRISC-Vボードをデバッグする方法を紹介しました。
今回はそのおまけです。VSCodeのデバッグの話を見たい方はその4をご覧ください。
デバッグ対象: Akaria NS31 on Arty 7
デバッグ対象は何でも良いと書きました。その例として、別のソフトウェア、別のボードを使うパターン(Akaria BSP + NS31 on Arty 7)を紹介します。
- CPU回路データ: NSITEXEサイトへのリンクから取得できます。
- FPGAへの書き込み: Vivadoサイトへのリンクから取得できます。書き込むだけならVivado Labソリューションで十分です。
- ツールチェーン: GitHubへのリンクから取得できます。アーカイブへの直接リンクはこちら(riscv64-unknown-elf, Ubuntu 22用)です。
- ソースコード: GitHubへのリンクから取得できます。
FPGAへの書き込み方は以前の日記(2023年4月24日の日記参照)でご紹介しました。そちらをご覧ください。
ツールチェーンのインストールをします。ディレクトリはどこでも良いですが、ここでは~/workで作業しているものとします。
RISC-V用ツールチェーンのインストール
$ cd ~/work
$ wget https://github.com/nsitexe/akaria-riscv-toolchain/releases/download/nsitexe-20231117/riscv64-unknown-elf_ubuntu22.tar.gz
$ tar xf riscv64-unknown-elf_ubuntu22.tar.gz
$ export PATH=~/work/riscv64-unknown-elf/bin:$PATH

$ riscv64-unknown-elf-gdb --version

GNU gdb (GDB) 13.0.50.20220805-git
Copyright (C) 2022 Free Software Foundation, Inc.
License GPLv3+: GNU GPL version 3 or later <http://gnu.org/licenses/gpl.html>
This is free software: you are free to change and redistribute it.
There is NO WARRANTY, to the extent permitted by law.
次にAkaria BSPのビルドをします。
Akaria BSPのビルド
$ git clone https://github.com/nsitexe/akaria-bmetal
$ cd akaria-bmetal/
$ rm -r build
$ cmake -B build -G Ninja -DARCH=riscv \
    -DCROSS_COMPILE=riscv64-unknown-elf- \
    -DCC=gcc \
    -DCMAKE_BUILD_TYPE=RelWithDebInfo \
    -DCMAKE_INSTALL_PREFIX=test/sysroot/ \
    -DDEFCONF=riscv_nsitexe_ns31_arty

CMake Warning (dev) at CMakeLists.txt:3 (project):
  cmake_minimum_required() should be called prior to this top-level project()
  call.  Please see the cmake-commands(7) manual for usage documentation of
  both commands.
This warning is for project developers.  Use -Wno-dev to suppress it.

-- The C compiler identification is GNU 13.2.0
-- The CXX compiler identification is GNU 13.2.0
-- Detecting C compiler ABI info
-- Detecting C compiler ABI info - done
-- Check for working C compiler: /usr/lib/ccache/cc - skipped
-- Detecting C compile features
-- Detecting C compile features - done
-- Detecting CXX compiler ABI info
-- Detecting CXX compiler ABI info - done
-- Check for working CXX compiler: /usr/lib/ccache/c++ - skipped
-- Detecting CXX compile features
-- Detecting CXX compile features - done
-- The ASM compiler identification is GNU
-- Found assembler: /usr/lib/ccache/cc
---- CC is 'gcc'
---- Compiler is 'riscv64-unknown-elf-gcc'
---- CCASM is 'gcc'
---- Assembler is 'riscv64-unknown-elf-gcc'
---- DEFCONF is 'riscv_nsitexe_ns31_arty'
---- CONF dir is '/home/katsuhiro/work/akaria-bmetal/config'
---- ARCH dir is '/home/katsuhiro/work/akaria-bmetal/arch/riscv'
---- SOC dir is '/home/katsuhiro/work/akaria-bmetal/arch/riscv/nsitexe_ns31'
---- BOARD dir is '/home/katsuhiro/work/akaria-bmetal/board/riscv/nsitexe_ns31_arty'
---- arch  is riscv
---- march is 'rv32imafc_zicsr_zifencei'
---- mabi  is 'ilp32f'
-- Found Doxygen: /usr/bin/doxygen (found version "1.9.4") found components: doxygen dot
-- Configuring done (0.3s)
-- Generating done (0.0s)
-- Build files have been written to: /home/katsuhiro/work/akaria-bmetal/build


$ ninja -C build install

ninja: Entering directory `build'
[46/47] Install the project...
-- Install configuration: "RelWithDebInfo"
-- Installing: /home/katsuhiro/work/akaria-bmetal/test/sysroot/bin/add_auxdata
-- Installing: /home/katsuhiro/work/akaria-bmetal/test/sysroot/lib/libbmetal_crt.a
-- Installing: /home/katsuhiro/work/akaria-bmetal/test/sysroot/include/bmetal
-- Installing: /home/katsuhiro/work/akaria-bmetal/test/sysroot/include/bmetal/bmetal.h
-- Up-to-date: /home/katsuhiro/work/akaria-bmetal/test/sysroot/include/bmetal
-- Installing: /home/katsuhiro/work/akaria-bmetal/test/sysroot/include/bmetal/generated
-- Installing: /home/katsuhiro/work/akaria-bmetal/test/sysroot/include/bmetal/generated/autoconf.h
-- Installing: /home/katsuhiro/work/akaria-bmetal/test/sysroot/include/bmetal/generated/linker_gen.ld
テストアプリをビルドします。
Akaria BSPテストアプリのビルド
$ cd ~/work/akaria-bmetal/test
$ make USE_NEWLIB=y
ビルドできました。1つ目の端末にてOpenOCDを起動します。
OpenOCDの起動
$ sudo openocd -c 'bindto 0.0.0.0' -f tcl/interface/jlink.cfg -f ./openocd-ns31.cfg
JTAGインタフェース用の設定ファイルtcl/interface/jlink.cfgはその2(2023年12月30日の日記参照)にてご紹介しています。SEGGER J-Link以外のインタフェースをご利用の場合は適宜変更をお願いします。
NS31 on Arty 7用の設定ファイルopenocd-ns31.cfgは以前の日記(2023年4月7日の日記参照)にてご紹介しています。
2つ目の端末にてGDBを使ってロード&実行します。
GDBによるロード&実行
$ riscv64-unknown-elf-gdb hello

(gdb) target remote :3333
(gdb) monitor reset halt
(gdb) load
(gdb) continue
UARTから出力されていることを確認します。
NS31 on Arty 7のUART出力
$ pyserial-miniterm /dev/ttyUSB1 9600 --raw

--- Miniterm on /dev/ttyUSB1  9600,8,N,1 ---
--- Quit: Ctrl+] | Menu: Ctrl+T | Help: Ctrl+T followed by Ctrl+H ---
hello world!
good bye world!
Zephyr + HiFive1のときとロード&実行方法は一緒です。最初はとっつきにくいかもしれませんが、OpenOCDとGDBの組み合わせであれば他のソフトウェア、他のボードでもほぼ一緒の使い勝手で便利です。
コメント一覧
- コメントはありません。
 この記事にコメントする
2023年12月30日
VSCodeでRISC-Vボードをデバッグその2 - Linuxマシン側の準備(Zephyr RTOS)
目次: Linux
前回はVisual Studio Code(以降VSCode)とSSH Remote Extensionを使ってLinuxマシンに接続するところまでを設定しました。
今回はその続き……の前に準備としてLinuxマシンだけを使って、
- OpenOCDを起動
- GDBで実行ファイルをロード&実行
- GDBでCUIデバッグする方法
を紹介します。
デバッグ対象: SiFive HiFive1ボード
デバッグ対象は何でも良いですがそう言われても困ると思うのでZephyr RTOSとSiFive HiFive1 Rev Bボードを使用します。Zephyr RTOSの開発環境セットアップとビルドは以前の日記(2023年12月27日の日記参照)で紹介しています。
以前の日記ではQEMU向けにビルドしましたが、今回は実ボードSiFive HiFive1 Rev B向けにビルドします。といってもほぼ同じです。下記のようにします。
Zephyrのビルド(west版)
$ west build -p always -b hifive1_revb samples/hello_world/
$ west flash
これでボードに実行ファイルが書き込まれて実行開始されるはずですが、これじゃ何だかわからない、中身をもう少し知りたい、という方のためにCMakeとGDBを使った手順を紹介します。
Zephyrのビルド(CMake版)
$ rm -r build
$ cmake -B build -G Ninja -DBOARD=hifive1_revb samples/hello_world
$ ninja -C build

$ ls build/zephyr
CMakeFiles           kernel                      zephyr.bin
arch                 lib                         zephyr.dts
boards               libzephyr.a                 zephyr.dts.d
cmake                linker.cmd                  zephyr.dts.pre
cmake_install.cmake  linker.cmd.dep              zephyr.elf    ★これがGDBなどで使う実行ファイル
drivers              linker_zephyr_pre0.cmd      zephyr.lst
dts.cmake            linker_zephyr_pre0.cmd.dep  zephyr.map
edt.pickle           misc                        zephyr.stat
include              runners.yaml                zephyr_final.map
isrList.bin          snippets_generated.cmake    zephyr_pre0.elf
isr_tables.c         soc                         zephyr_pre0.map
kconfig              subsys
ビルドに成功するとbuild/zephyr/zephyr.elfという実行ファイル(ELF形式)が生成されるはずです。
OpenOCDを起動
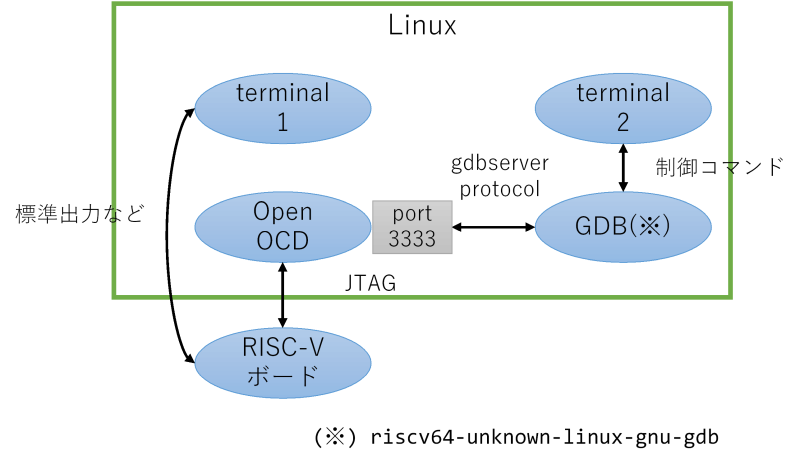
SiFive HiFive1ボードとLinuxマシンを以下の図のように接続しているとします。
端末を2つ用意し、1つ目の端末でOpenOCDを起動します。システムにインストールされているOpenOCDのバージョンによっては動かないかもしれません。OpenOCDのビルドについては以前の日記(2023年6月28日の日記参照)で紹介しています。
OpenOCDの起動(Linux単独版)
$ sudo openocd -c 'bindto 0.0.0.0' -f tcl/interface/jlink.cfg -f tcl/board/sifive-hifive1-revb.cfg

Open On-Chip Debugger 0.12.0+dev-01422-g1b0b07baa-dirty (2023-11-30-05:58)
Licensed under GNU GPL v2
For bug reports, read
        http://openocd.org/doc/doxygen/bugs.html
Warn : Interface already configured, ignoring
Info : J-Link OB-K22-SiFive compiled Nov 22 2019 12:57:38
Info : Hardware version: 1.00
Info : VTarget = 3.300 V
Info : clock speed 4000 kHz
Info : JTAG tap: riscv.cpu tap/device found: 0x20000913 (mfg: 0x489 (SiFive Inc)
, part: 0x0000, ver: 0x2)
Info : datacount=1 progbufsize=16
Info : Disabling abstract command reads from CSRs.
Info : Examined RISC-V core; found 1 harts
Info :  hart 0: XLEN=32, misa=0x40101105
Info : starting gdb server for riscv.cpu.0 on 3333
Info : Listening on port 3333 for gdb connections
Info : Found flash device 'issi is25lp032' (ID 0x0016609d)
Ready for Remote Connections
Info : Listening on port 6666 for tcl connections
Info : Listening on port 4444 for telnet connections
OpenOCDに指定しているtcl/interface/xxxx.cfgというファイルは、OpenOCDのソースコードに含まれています。GitでOpenOCDのソースコードを丸ごと持ってくるか、
OpenOCDのソースコードリポジトリ取得
$ git clone https://git.code.sf.net/p/openocd/code openocd-code
コードを眺めるだけならGitHubのミラー(GitHubへのリンク)が見やすいです。
- jlink.cfg(GitHubへのリンク)
- sifive-hifive1-revb.cfg(GitHubへのリンク)
必要なファイルだけ見たい人は上記のリンクからどうぞ。
GDBで実行ファイルをロード&実行
次に2つ目の端末にてGDBを起動します。Zephyr SDKへのパスを通すのをお忘れなく。パスの通し方は(2023年12月27日の日記参照)の「Zephyr開発環境への入り方」を参照してください。
GDBの起動(Linux単独版)
$ riscv64-zephyr-elf-gdb build/zephyr/zephyr.elf

(略)

For help, type "help".
Type "apropos word" to search for commands related to "word"...
Reading symbols from build/zephyr/zephyr.elf...

(gdb) target remote :3333

(gdb) monitor reset halt

(gdb) load

Loading section rom_start, size 0x18 lma 0x20010000
Loading section reset, size 0x6 lma 0x20010018
Loading section exceptions, size 0x146 lma 0x20010020
Loading section text, size 0x35a2 lma 0x20010168
Loading section initlevel, size 0x40 lma 0x2001370c
Loading section device_area, size 0x50 lma 0x2001374c
Loading section sw_isr_table, size 0x200 lma 0x2001379c
Loading section log_const_area, size 0x20 lma 0x2001399c
Loading section rodata, size 0x460 lma 0x200139bc
Loading section datas, size 0xdc lma 0x20013e1c
Loading section device_states, size 0x8 lma 0x20013ef8
Loading section .last_section, size 0x4 lma 0x20013f00
Start address 0x20010000, load size 16126
Transfer rate: 595 bytes/sec, 1343 bytes/write.

(gdb) continue
HiFive1のUARTからZephyrというかHello worldアプリのメッセージが出ていることを確認しましょう。
HiFive1のUART確認
$ pyserial-miniterm /dev/ttyACM0 115200

--- Miniterm on /dev/ttyACM0  115200,8,N,1 ---
--- Quit: Ctrl+] | Menu: Ctrl+T | Help: Ctrl+T followed by Ctrl+H ---
*** Booting Zephyr OS build zephyr-v3.4.0-1149-g2bf091f8af5b ***
Hello World! hifive1_revb
HiFive1は動作が遅いためかOpenOCD側に下記のような警告が何度か出ます。
OpenOCDの警告
JTAG tap: riscv.cpu tap/device found: 0x20000913 (mfg: 0x489 (SiFive Inc), part: 0x0000, ver: 0x2)
keep_alive() was not invoked in the 1000 ms timelimit. GDB alive packet not sent! (1497 ms). Workaround: increase "set remotetimeout" in GDB
動作に支障はないですが、警告に書いてあるworkaroundの通りset remotetimeout unlimitedとしても警告が出続けるのは若干気になりますね……。
GDBでCUIデバッグする方法
普通のLinuxアプリケーションをデバッグするときと同じように使えます。
GDB CUIによるデバッグ
(gdb) monitor reset halt

(gdb) d

Delete all breakpoints? (y or n) y

(gdb) hb main

Hardware assisted breakpoint 1 at 0x20010970: file zephyr/zephyr/samples/hello_world/src/main.c, line 11.

(gdb) c

Continuing.

Breakpoint 1, main () at zephyr/zephyr/samples/hello_world/src/main.c:11
11              printk("Hello World! %s\n", CONFIG_BOARD);
HiFive1はRAMが非常に少ないためXIP(Execution In Place)つまりフラッシュROM上のプログラムを直接実行します。そのためブレークポイントは自動的にハードウェア支援ブレークポイント(hbで使えるものと一緒)になります。ハードウェア支援ブレークポイントは設定可能な数に上限があるため、通常のブレークポイントと挙動が異なったり、エラーになったりすることがあります。
あと全体的に非常に遅いです。stepやnextを実行するとしばらく反応が返ってきません。例として使うには良くなかったかな……。
おまけ、リモートデバッグ
これだけだとwestの焼き直しで面白くないので、おまけとして遠隔地にあるボードを扱う方法をご紹介します。
繰り返しになりますがOpenOCDのビルドについては以前の日記(2023年6月28日の日記参照)で紹介しています。Raspberry Pi用のOpenOCDをビルドするときにご参照ください。
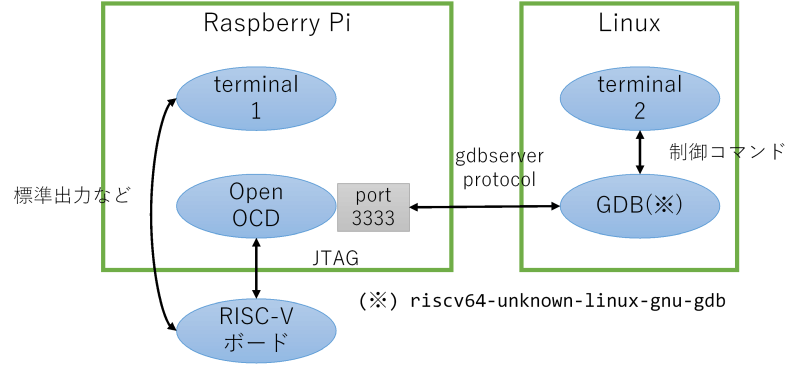
SiFive HiFive1ボードとRaspberry PiとLinuxマシンを以下の図のように接続しているとします。Linuxマシンもしくは、HiFive1ボードとRaspberry Piのペアがお互いに離れている状況を考えてもらうとわかりやすいかと思います。
例えばLinuxマシンを2階におき、Raspberry PiとHiFive1ボード(とLinuxマシンを操作するノートPCとか)を1階の机に置く、といったデバッグ環境が作れます。家と会社などでもアリです。
やることは基本的に同じです。Raspberry Pi側で1つ目の端末を起動し、OpenOCDを起動します。起動するコマンドも同じです。
OpenOCDの起動(LinuxとRasPiコンビ版)
#### Raspberry Pi側の端末

$ sudo openocd -c 'bindto 0.0.0.0' -f tcl/interface/jlink.cfg -f tcl/board/sifive-hifive1-revb.cfg

Open On-Chip Debugger 0.12.0+dev-01422-g1b0b07baa-dirty (2023-11-30-05:58)
Licensed under GNU GPL v2
For bug reports, read
        http://openocd.org/doc/doxygen/bugs.html
Warn : Interface already configured, ignoring
Info : J-Link OB-K22-SiFive compiled Nov 22 2019 12:57:38
Info : Hardware version: 1.00
Info : VTarget = 3.300 V
Info : clock speed 4000 kHz
Info : JTAG tap: riscv.cpu tap/device found: 0x20000913 (mfg: 0x489 (SiFive Inc)
, part: 0x0000, ver: 0x2)
Info : datacount=1 progbufsize=16
Info : Disabling abstract command reads from CSRs.
Info : Examined RISC-V core; found 1 harts
Info :  hart 0: XLEN=32, misa=0x40101105
Info : starting gdb server for riscv.cpu.0 on 3333
Info : Listening on port 3333 for gdb connections
Info : Found flash device 'issi is25lp032' (ID 0x0016609d)
Ready for Remote Connections
Info : Listening on port 6666 for tcl connections
Info : Listening on port 4444 for telnet connections
次にLinux側で2つ目の端末を起動し、GDBを起動します。異なるのはremote targetコマンドの部分のみです。Raspberry PiのIPアドレスが192.168.1.10だとします。
GDBの起動(LinuxとRasPiコンビ版)
#### Linuxマシン側の端末

$ riscv64-zephyr-elf-gdb build/zephyr/zephyr.elf

(略)

For help, type "help".
Type "apropos word" to search for commands related to "word"...
Reading symbols from build/zephyr/zephyr.elf...

(gdb) target remote 192.168.1.10:3333

(gdb) monitor reset halt

(gdb) load

Loading section rom_start, size 0x18 lma 0x20010000
Loading section reset, size 0x6 lma 0x20010018
Loading section exceptions, size 0x146 lma 0x20010020
Loading section text, size 0x35a2 lma 0x20010168
Loading section initlevel, size 0x40 lma 0x2001370c
Loading section device_area, size 0x50 lma 0x2001374c
Loading section sw_isr_table, size 0x200 lma 0x2001379c
Loading section log_const_area, size 0x20 lma 0x2001399c
Loading section rodata, size 0x460 lma 0x200139bc
Loading section datas, size 0xdc lma 0x20013e1c
Loading section device_states, size 0x8 lma 0x20013ef8
Loading section .last_section, size 0x4 lma 0x20013f00
Start address 0x20010000, load size 16126
Transfer rate: 595 bytes/sec, 1343 bytes/write.

(gdb) continue
GDBとOpenOCD間がTCP/IPで通信しているからできる技ですね。使ってみるとわかる便利さです。
コメント一覧
- コメントはありません。
 この記事にコメントする
2023年12月29日
VSCodeでRISC-Vボードをデバッグその1 - SSH Remote Extensionの設定
目次: Linux
Visual Studio Code(以降VSCode)のSSH Remote Extensionを使って、LinuxマシンのGDBを起動、OpenOCDに接続、RISC-Vボードをデバッグする方法をメモしておきます。
以前紹介した方法(2021年3月3日の日記参照)と似ていますがWindows用のGDBバイナリをビルドする必要がないという利点があります。
今回はSSH Remote Extensionのインストールと設定です。
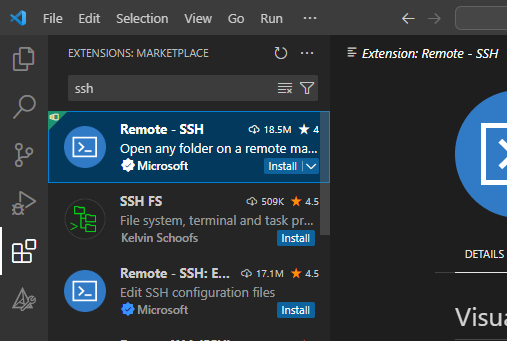
最初にExtensionsからSSH Remoteをインストールします。
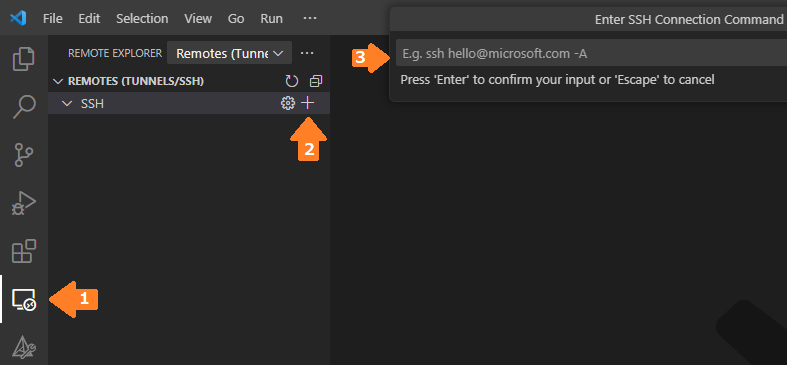
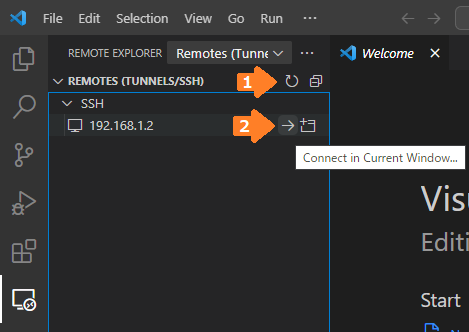
REMOTE EXPLORER(矢印1)からNew Remoteを選択して(矢印2)GDBがインストールされているLinuxマシンを指定します(矢印3)。指定方法は例にある通りusername@hostnameです。
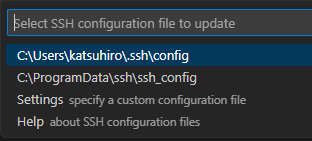
SSHの接続先設定を保存するファイル名を指定します。私は特にこだわりがないので、デフォルトのC:\Users\(ユーザー名)\.ssh\configを使いました。
SSHの設定を追加したら、REMOTES (TUNNELS/SSH)のRefreshを押します(矢印1)。追加した設定が表示されたらConnect in Current Windowを押します(矢印2)。
接続先のマシンはLinuxか?Windowsか?macOSか?と聞かれます。今回はLinuxを使っているのでLinuxを選択します。
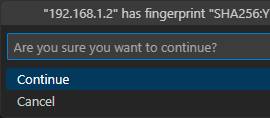
接続しようとしているホストのfingerprintが表示され、本当に接続するか?と質問されます。初めて接続するホストの場合は必ず聞かれます。continueを押してください。
もしこの質問が2回目以降の接続で表示される場合は、異なるホストが同じIPアドレスを使用しているなど何らかの異常が発生している可能性があります。迂闊にcontinueを押さず、本当に接続して良いか確認してください。
パスワードを入力してください。
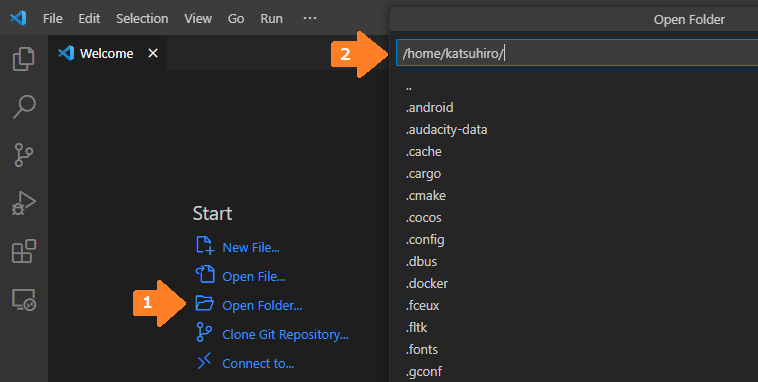
接続に成功するとWelcome画面が表示されるはずなので、Open Folder(矢印1)を押して、デバッグしたいソースコードがあるディレクトリのパスを指定(矢印2)します。
続きはまた今度。
コメント一覧
- コメントはありません。
 この記事にコメントする
2023年12月28日
帰省
今年は奥さんの実家である鳥取に帰省しました。
夫婦お互いの実家が近ければそれぞれ3日ずつ滞在などできますが、我が家の場合は結構遠い(奥さんは鳥取、私は北海道)のです……。仕方ないので帰省のルールとして、
- 正月、GW、お盆の年3回帰省する
- 夫婦一緒に帰省する
- 行き先は毎回変える(GW: 鳥取、お盆: 北海道、正月: 鳥取、GW: 北海道、、、のように)
というルールで運用していました。なので鳥取での年越しは2年に1回となりますが、近年はCOVID-19騒ぎで帰れなかったり、自分達もCOVIDに感染したりでルール運用が乱れ、鳥取での年越しのチャンスがありませんでした。
たぶん2019年末以来じゃないかな?つまり4年ぶり?
コメント一覧
- コメントはありません。
 この記事にコメントする
2023年12月27日
Hello! Zephyr OS!!(2023年版)
目次: Zephyr
Zephyr RTOSのインストール、ビルドの手順が少し変わったので改めて紹介したいと思います。
基本的にはZephyrのGetting Startedに記載の通りですが、実行する上での補足や引っかかるところを説明したいと思います。
Zephyr開発環境のセットアップ
以降、作業するディレクトリは~/workとします。
ZephyrのGetting Startedを順に実行します。既存のPython環境を壊さないようにInstall within virtual environmentの手順を使うことをお勧めします。
依存ツールインストールとPython venv環境の作成
# apt-get install git cmake ninja-build gperf \
    ccache dfu-util device-tree-compiler wget \
    python3-dev python3-pip python3-setuptools python3-tk python3-wheel xz-utils file \
    make gcc gcc-multilib g++-multilib libsdl2-dev libmagic1

# apt-get install python3-venv

$ cd ~/work/zephyr-sdk-0.16.4/
$ python3 -m venv _venv
$ source ~/work/zephyr-sdk-0.16.4/_venv/bin/activate
Python venvを有効にするとシェルのプロンプトの頭に(_venv)のような環境名が付くようになります。venv用のディレクトリはどこに作成しても良いです。私はZephyr SDKの下に作ることが多いです。作成済みのvenvを再度使うときはsource ~/work/zephyr-sdk-0.16.4/_venv/bin/activateを実行します。
続きを実行しましょう。westを使ってZephyrと周辺ツール群をダウンロードします。
Zephyrと周辺ツール群をダウンロード
$ pip install west
$ cd ~/work
$ west init zephyr

=== Initializing in /home/katsuhiro/work/zephyr
--- Cloning manifest repository from https://github.com/zephyrproject-rtos/zephyr
Cloning into '/home/katsuhiro/work/zephyr/.west/manifest-tmp'...
remote: Enumerating objects: 968377, done.
remote: Counting objects: 100% (17/17), done.
remote: Compressing objects: 100% (13/13), done.
remote: Total 968377 (delta 8), reused 8 (delta 4), pack-reused 968360
Receiving objects: 100% (968377/968377), 600.07 MiB | 20.80 MiB/s, done.
Resolving deltas: 100% (733897/733897), done.
Updating files: 100% (31355/31355), done.
--- setting manifest.path to zephyr
=== Initialized. Now run "west update" inside /home/katsuhiro/work/zephyr.

$ cd ~/work/zephyr
$ west update

(大量にリポジトリがクローンされますのでしばし待ちます)


$ west zephyr-export

Zephyr (/home/katsuhiro/work/zephyr/zephyr/share/zephyr-package/cmake)
has been added to the user package registry in:
~/.cmake/packages/Zephyr

ZephyrUnittest (/home/katsuhiro/work/zephyr/zephyr/share/zephyrunittest-package/cmake)
has been added to the user package registry in:
~/.cmake/packages/ZephyrUnittest


$ pip install -r ~/work/zephyr/zephyr/scripts/requirements.txt

(大量にモジュールがインストールされますのでしばし待ちます)
基本的にはコマンドを実行して待つだけです。たぶん。
SDKをインストールします。アーカイブはGitHubのreleaseページから取得できます。特にこだわりがなければ、現状の最新版である0.16.4を使ってください。
アーカイブがたくさんあって迷うと思いますが、今回はサイズが小さくてインストールするツールチェーンを選択できるzephyr-sdk-0.16.4_linux-x86_64_minimal.tar.xzを使います。
Zephyr SDKのインストール
$ wget https://github.com/zephyrproject-rtos/sdk-ng/releases/download/v0.16.4/zephyr-sdk-0.16.4_linux-x86_64_minimal.tar.xz
$ tar xf zephyr-sdk-0.16.4_linux-x86_64_minimal.tar.xz
$ cd ~/work/zephyr-sdk-0.16.4/

$ ./setup.sh -c -t riscv64-zephyr-elf

Zephyr SDK 0.16.4 Setup

Installing 'riscv64-zephyr-elf' toolchain ...
toolchain_linux-x86 100%[===================>] 105.07M  24.7MB/s 時間 4.3s

All done.
何も引数を付けずにすべてインストールしても良いです(が、結構時間が掛かります)。今回はRISC-V向けのツールチェーンがあれば良いので-t riscv64-zephyr-elfを付けることで時間短縮しました。注意点としては-cオプションを忘れないようにしてください。Zephyrビルド時にエラーが発生します。
次にhosttoolsをインストールします。要らない場合もありますが、今回はQEMUを使って動作確認したいのでインストールしましょう。
hosttoolsのインストール
$ ./zephyr-sdk-x86_64-hosttools-standalone-0.9.sh

Zephyr Yocto Toolchain SDK installer version 0.9
================================================
Enter target directory for SDK (default: /opt/zephyr-sdk/0.9): /home/katsuhiro/work/zephyr-sdk-0.16.4/host
You are about to install the SDK to "/home/katsuhiro/work/zephyr-sdk-0.16.4/host". Proceed [Y/n]? y
Extracting SDK..................done
Setting it up...done
SDK has been successfully set up and is ready to be used.
Each time you wish to use the SDK in a new shell session, you need to source the environment setup script e.g.
 $ . /home/katsuhiro/work/zephyr-sdk-0.16.4/host/environment-setup-x86_64-pokysdk-linux
上記の作業を全て終えた後のディレクトリ構造はこんな感じです。
Zephyr開発環境のディレクトリ構成
$ tree -L 2 ~/work

/home/katsuhiro/work
|-- zephyr
|   |-- bootloader
|   |-- modules
|   |-- tools
|   `-- zephyr                ★Zephyr RTOSのコード
|-- zephyr-sdk-0.16.4
|   |-- _venv
|   |-- cmake
|   |-- host                  ★hosttools
|   |-- riscv64-zephyr-elf    ★RISC-V用ツールチェーン
|   |-- sdk_toolchains
|   |-- sdk_version
|   |-- setup.sh
|   `-- zephyr-sdk-x86_64-hosttools-standalone-0.9.sh
`-- zephyr-sdk-0.16.4_linux-x86_64_minimal.tar.xz
Zephyr開発環境はセットアップ手順は短くなったとは思うんですけど、中身は複雑になってトラブルが起きたときの解決が困難になった印象です。昔より依存するツールが増えているのかな……?
Zephyr開発環境への入り方
使用したいツールに応じて環境を有効化すると良いです。
Zephyr開発環境への入り方の例
#### Python venv環境を有効化

$ source ~/work/zephyr-sdk-0.16.4/_venv/bin/activate

#### QEMUなどhosttoolsを使う場合、hosttoolsを有効化

$ source ~/work/zephyr-sdk-0.16.4/host/environment-setup-x86_64-pokysdk-linux

#### デバッガなどを直接実行するならばツールチェーンにパスを通す

$ export PATH=~/work/zephyr-sdk-0.16.4/riscv64-zephyr-elf/bin:$PATH
私はいちいち選ぶのが面倒なので、全部有効にしております。
Zephyrのビルドと実行
Zephyr開発環境が正常にセットアップできたかどうか確かめるため、QEMU向けにビルドしましょう。
Zephyrのビルド(west版)
$ cd ~/work/zephyr/zephyr
$ west build -p always -b qemu_riscv64 samples/hello_world/

(ログは省略)
ビルドできたので実行したいところですが、なぜかwestを使ってQEMUで実行する方法が見当たりません。仕方ないのでcmakeでビルド&実行します。こちらのやり方も覚えておいて損はないでしょう……。
Zephyrのビルド(cmake版)
$ cd ~/work/zephyr/zephyr
$ rm -r build
$ cmake -B build -G Ninja -DBOARD=qemu_riscv64 samples/hello_world

Loading Zephyr default modules (Zephyr repository).
-- Application: /home/katsuhiro/work/zephyr/zephyr/samples/hello_world
-- CMake version: 3.22.1
-- Found Python3: /home/katsuhiro/work/zephyr-sdk-0.16.4/_venv/bin/python (found suitable version "3.10.12", minimum required is "3.8") found components: Interpreter
-- Cache files will be written to: /home/katsuhiro/.cache/zephyr
-- Zephyr version: 3.5.99 (/home/katsuhiro/work/zephyr/zephyr)
-- Found west (found suitable version "1.2.0", minimum required is "0.14.0")
-- Board: qemu_riscv64
-- ZEPHYR_TOOLCHAIN_VARIANT not set, trying to locate Zephyr SDK
-- Found host-tools: zephyr 0.16.4 (/home/katsuhiro/work/zephyr-sdk-0.16.4)
-- Found toolchain: zephyr 0.16.4 (/home/katsuhiro/work/zephyr-sdk-0.16.4)
-- Found Dtc: /home/katsuhiro/work/zephyr-sdk-0.16.4/host/sysroots/x86_64-pokysdk-linux/usr/bin/dtc (found suitable version "1.6.0", minimum required is "1.4.6")
-- Found BOARD.dts: /home/katsuhiro/work/zephyr/zephyr/boards/riscv/qemu_riscv64/qemu_riscv64.dts
-- Generated zephyr.dts: /home/katsuhiro/work/zephyr/zephyr/build/zephyr/zephyr.dts
-- Generated devicetree_generated.h: /home/katsuhiro/work/zephyr/zephyr/build/zephyr/include/generated/devicetree_generated.h
-- Including generated dts.cmake file: /home/katsuhiro/work/zephyr/zephyr/build/zephyr/dts.cmake
Parsing /home/katsuhiro/work/zephyr/zephyr/Kconfig
Loaded configuration '/home/katsuhiro/work/zephyr/zephyr/boards/riscv/qemu_riscv64/qemu_riscv64_defconfig'
Merged configuration '/home/katsuhiro/work/zephyr/zephyr/samples/hello_world/prj.conf'
Configuration saved to '/home/katsuhiro/work/zephyr/zephyr/build/zephyr/.config'
Kconfig header saved to '/home/katsuhiro/work/zephyr/zephyr/build/zephyr/include/generated/autoconf.h'
-- Found GnuLd: /home/katsuhiro/work/zephyr-sdk-0.16.4/riscv64-zephyr-elf/bin/../lib/gcc/riscv64-zephyr-elf/12.2.0/../../../../riscv64-zephyr-elf/bin/ld.bfd (found version "2.38")
-- The C compiler identification is GNU 12.2.0
-- The CXX compiler identification is GNU 12.2.0
-- The ASM compiler identification is GNU
-- Found assembler: /home/katsuhiro/work/zephyr-sdk-0.16.4/riscv64-zephyr-elf/bin/riscv64-zephyr-elf-gcc
-- Using ccache: /usr/bin/ccache
-- Configuring done
-- Generating done
-- Build files have been written to: /home/katsuhiro/work/zephyr/zephyr/build


$ ninja -C build

ninja: Entering directory `build'
[1/99] Preparing syscall dependency handling

[2/99] Generating include/generated/version.h
-- Zephyr version: 3.5.99 (/home/katsuhiro/work/zephyr/zephyr), build: zephyr-v3.5.0-3603-g603c3af895b0
[98/99] Linking C executable zephyr/zephyr.elf
Memory region         Used Size  Region Size  %age Used
             RAM:       36140 B       256 MB      0.01%
        IDT_LIST:          0 GB         2 KB      0.00%
Generating files from /home/katsuhiro/work/zephyr/zephyr/build/zephyr/zephyr.elf for board: qemu_riscv64
[99/99] cd /home/katsuhiro/work/zephyr.../zephyr/zephyr/build/zephyr/zephyr.elf


$ ninja -C build run

ninja: Entering directory `build'
[0/1] To exit from QEMU enter: 'CTRL+a, x'[QEMU] CPU: riscv64
*** Booting Zephyr OS build zephyr-v3.5.0-3603-g603c3af895b0 ***
Hello World! qemu_riscv64
実行できました。もしエラーが出る場合は次のトラブルシューティングもご参照ください。
トラブルシューティング
Zephyr SDKセットアップ時に-cオプションを付けない = Zephyr SDK cmake packageのインストールを忘れていると、Zephyrのビルド時に長々とエラーが出て怒られます。
Zephyr SDK cmake packageをインストールしていないと発生するエラー
CMake Error at /home/katsuhiro/work/zephyr/zephyr/cmake/modules/FindZephyr-sdk.c
make:109 (find_package):
  Could not find a package configuration file provided by "Zephyr-sdk"
  (requested version 0.16) with any of the following names:

    Zephyr-sdkConfig.cmake
    zephyr-sdk-config.cmake

  Add the installation prefix of "Zephyr-sdk" to CMAKE_PREFIX_PATH or set
  "Zephyr-sdk_DIR" to a directory containing one of the above files.  If
  "Zephyr-sdk" provides a separate development package or SDK, be sure it has
  been installed.
Call Stack (most recent call first):
  /home/katsuhiro/work/zephyr/zephyr/cmake/modules/FindHostTools.cmake:53 (find_package)
  /home/katsuhiro/work/zephyr/zephyr/cmake/modules/dts.cmake:9 (find_package)
  /home/katsuhiro/work/zephyr/zephyr/cmake/modules/zephyr_default.cmake:129 (include)
  /home/katsuhiro/work/zephyr/zephyr/share/zephyr-package/cmake/ZephyrConfig.cmake:66 (include)
  /home/katsuhiro/work/zephyr/zephyr/share/zephyr-package/cmake/ZephyrConfig.cmake:92 (include_boilerplate)
  CMakeLists.txt:5 (find_package)
Zephyr SDKのセットアップは2回実行しても問題ないので-cオプションを付けてやり直しましょう。
コメント一覧
- コメントはありません。
 この記事にコメントする
2023年12月25日
クロスビルド用ツールチェーン - なぜか必要なsysroot/usr/lib
目次: GCC
最近はRISC-V向けのクロスコンパイラをビルドすることが多かったのですが、昔を思い出してARM向けも作るか〜と気軽にやってみたらハマりました。
最初にトライしたのはarm-unknown-linux-gnueabi(昔の32bit ARM向け、ARM9とか)で、特に問題なくビルドできました。次にトライしたのはaarch64-unknown-linux-gnu(64bit ARM向け、最近のCortexとか)ですが、リンクエラーが発生してcrt1.oやcrti.oが見つからないと言ってきます。
AArch64向けクロスGCCのリンクエラー
$ aarch64-unknown-linux-gnu-gcc -Wall -O2 -g -static a.c

/path/to/aarch64-unknown-linux-gnu/lib/gcc/aarch64-unknown-linux-gnu/12.0.1/../../../../aarch64-unknown-linux-gnu/bin/ld: cannot find crt1.o: No such file or directory
/path/to/aarch64-unknown-linux-gnu/lib/gcc/aarch64-unknown-linux-gnu/12.0.1/../../../../aarch64-unknown-linux-gnu/bin/ld: cannot find crti.o: No such file or directory
/path/to/aarch64-unknown-linux-gnu/lib/gcc/aarch64-unknown-linux-gnu/12.0.1/../../../../aarch64-unknown-linux-gnu/bin/ld: cannot find -lc: No such file or directory
collect2: error: ld returned 1 exit status
最初はglibcのビルドに失敗したのかと思いましたが、crt1.oはsysroot/usr/lib64ディレクトリの下に存在していました。
glibcのファイル(crt1.o)は存在している
$ find -name crt1.o

./aarch64-unknown-linux-gnu/sysroot/usr/lib64/crt1.o
ファイルが存在しているのに見つからないのは、GCCが自動的に付与する-Lオプションが間違っている可能性大です。-vオプションでGCCのオプションを調べます。
うまくいかないときのGCC -vオプションの出力(一部抜粋)
--sysroot=/path/to/aarch64-unknown-linux-gnu/aarch64-unknown-linux-gnu/sysroot
-Bstatic
-X
-EL
-maarch64linux
crt1.o
crti.o
/path/to/aarch64-unknown-linux-gnu/lib/gcc/aarch64-unknown-linux-gnu/12.0.1/crtbeginT.o
-L/path/to/aarch64-unknown-linux-gnu/lib/gcc/aarch64-unknown-linux-gnu/12.0.1
-L/path/to/aarch64-unknown-linux-gnu/lib/gcc/aarch64-unknown-linux-gnu/12.0.1/../../../../aarch64-unknown-linux-gnu/lib/../lib64
-L/path/to/aarch64-unknown-linux-gnu/aarch64-unknown-linux-gnu/sysroot/lib/../lib64     ★★相対パスが入っている★★
-L/path/to/aarch64-unknown-linux-gnu/lib/gcc/aarch64-unknown-linux-gnu/12.0.1/../../../../aarch64-unknown-linux-gnu/lib
-L/path/to/aarch64-unknown-linux-gnu/aarch64-unknown-linux-gnu/sysroot/lib
/tmp/ccQ9tEVu.o
--start-group
-lgcc
-lgcc_eh
-lc
--end-group
/path/to/aarch64-unknown-linux-gnu/lib/gcc/aarch64-unknown-linux-gnu/12.0.1/crtend.o
crtn.o
困ったことにsysroot/usr/lib64を指定する-Lオプションがありません。なぜでしょう。
手掛かりになりそうなのは、sysroot/lib64ディレクトリの指定の仕方で、lib/../lib64のように一度libを経由しています。実はsysroot/usr/lib64も同じでsysroot/usr/libを経由している可能性があります。
ディレクトリの構造を調べるとsysroot/libは存在するものの、sysroot/usr/libは存在しませんでした。試しに空のsysroot/usr/libディレクトリを作成し、再度コンパイルするとエラーが解消しました。やったー。エラーだった時と何が違うか知るために-vオプションでGCCのオプションを調べます。
うまくいったときのGCC -vオプションの出力(一部抜粋)
--sysroot=/path/to/aarch64-unknown-linux-gnu/aarch64-unknown-linux-gnu/sysroot
-Bstatic
-X
-EL
-maarch64linux
/path/to/aarch64-unknown-linux-gnu/aarch64-unknown-linux-gnu/sysroot/usr/lib/../lib64/crt1.o
/path/to/aarch64-unknown-linux-gnu/aarch64-unknown-linux-gnu/sysroot/usr/lib/../lib64/crti.o
/path/to/aarch64-unknown-linux-gnu/lib/gcc/aarch64-unknown-linux-gnu/12.0.1/crtbeginT.o
-L/path/to/aarch64-unknown-linux-gnu/lib/gcc/aarch64-unknown-linux-gnu/12.0.1
-L/path/to/aarch64-unknown-linux-gnu/lib/gcc/aarch64-unknown-linux-gnu/12.0.1/../../../../aarch64-unknown-linux-gnu/lib/../lib64
-L/path/to/aarch64-unknown-linux-gnu/aarch64-unknown-linux-gnu/sysroot/lib/../lib64
-L/path/to/aarch64-unknown-linux-gnu/aarch64-unknown-linux-gnu/sysroot/usr/lib/../lib64     ★★やっぱりlib/../lib64になっている★★
-L/path/to/aarch64-unknown-linux-gnu/lib/gcc/aarch64-unknown-linux-gnu/12.0.1/../../../../aarch64-unknown-linux-gnu/lib
-L/path/to/aarch64-unknown-linux-gnu/aarch64-unknown-linux-gnu/sysroot/lib
-L/path/to/aarch64-unknown-linux-gnu/aarch64-unknown-linux-gnu/sysroot/usr/lib
/tmp/ccLe9HUo.o
--start-group
-lgcc
-lgcc_eh
-lc
--end-group
/path/to/aarch64-unknown-linux-gnu/lib/gcc/aarch64-unknown-linux-gnu/12.0.1/crtend.o
/path/to/aarch64-unknown-linux-gnu/aarch64-unknown-linux-gnu/sysroot/usr/lib/../lib64/crtn.o
やはりsysroot/usr/lib64を指定するパスにはsysroot/usr/libが含まれていました。原因は「最終のディレクトリに辿り着く途中のパスが存在しないから」と言えそうです。しかしどうしてGCCが勝手に-Lオプションを消すのかは謎のままで、若干スッキリしません。うーん。
コメント一覧
- コメントはありません。
 この記事にコメントする
2023年12月24日
サンタがマッハ5で街にやってくる(2023年)
目次: サンタ
去年(2022年12月24日の日記参照)と同様に、飛行機の位置をリアルタイムに表示するFlightradar24というサービス(サイトへのリンク)にてサンタが出現しました。クリスマス・イブの日にサンタが出現するのは毎年恒例のお約束演出です。私が見たときはインド上空を飛んでいました。
2021年のサンタは表示された対地速度は40ktsなのに、サンタの位置から計算した速度はマッハ2 = 1300ktsと変な状態でしたが、2023年と今年は対地速度の表示は727kts(1346.4km/h, マッハ1.1くらい)です。
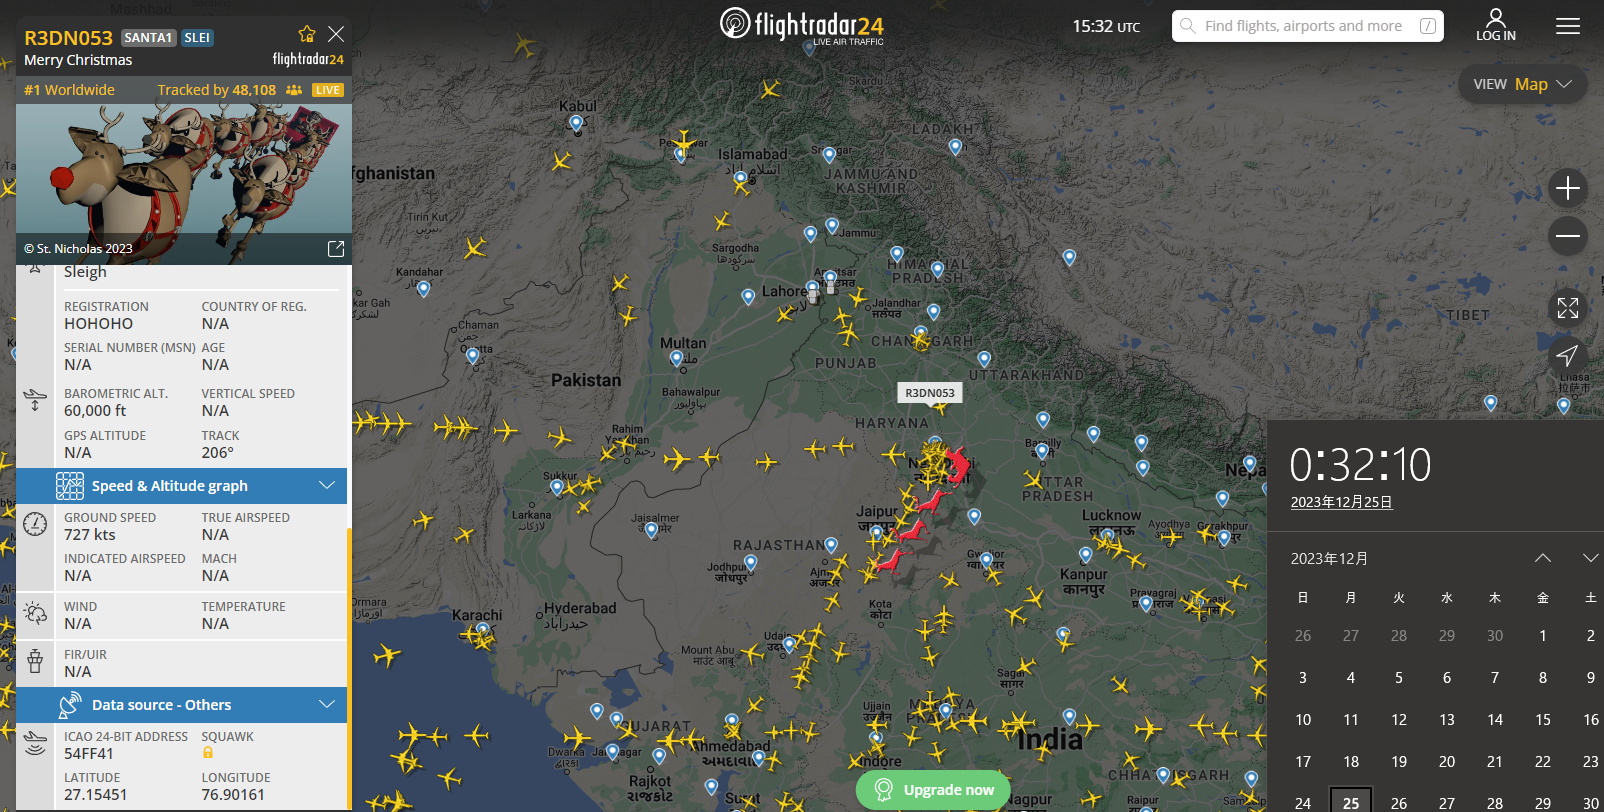
00:32:10時点の位置(緯度27.15451度、経度76.90161度)
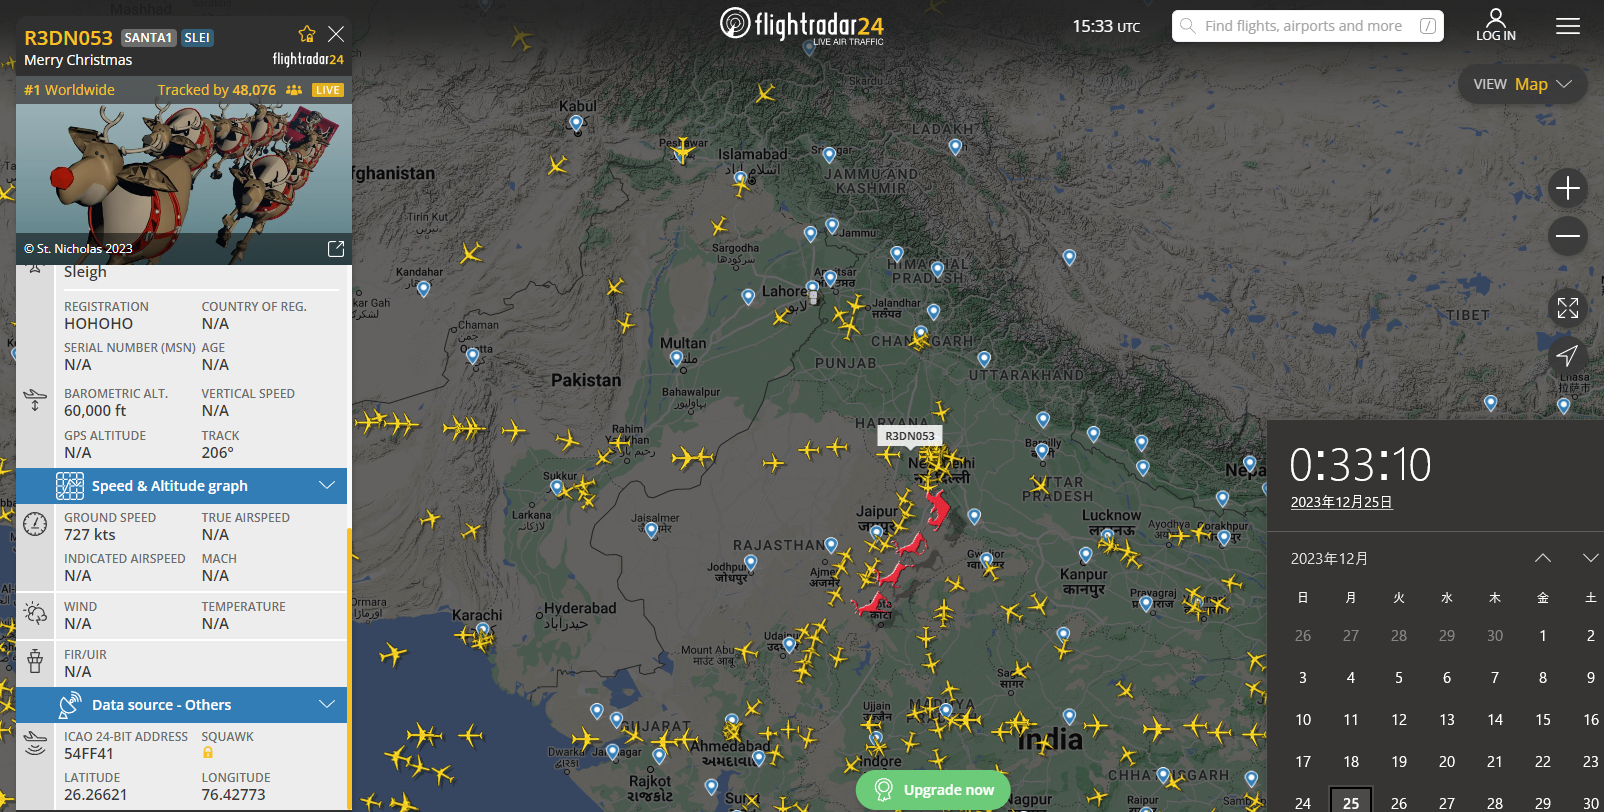
00:33:10時点の位置(緯度26.26621度、経度76.42773度)
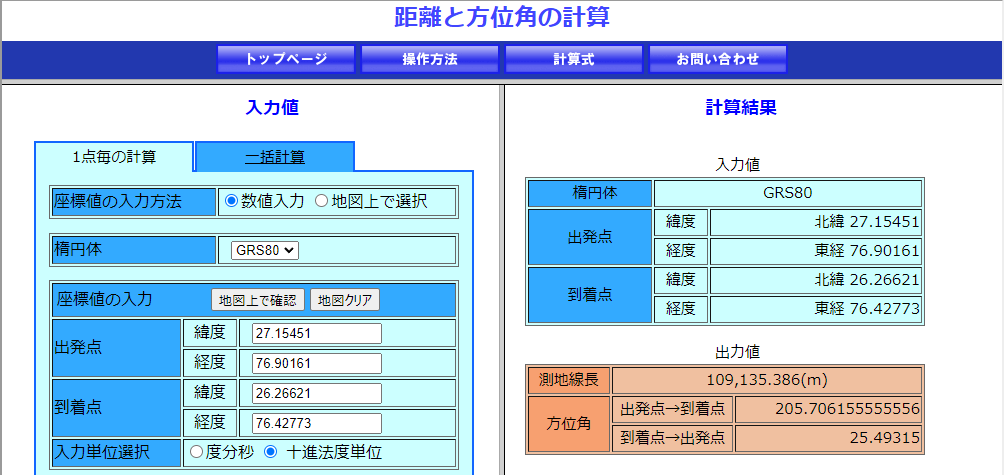
去年同様、ある程度の時間をあけ(今回は1分間)でどれくらい進んだか計算します。今回も距離の計算には国土地理院のページを使いました、緯度経度から距離を一発で計算してくれて便利です(サイトへのリンク)。
2地点間の距離は約109.1km、時間差は60秒から計算すると、対地速度は約6,540km/hです。地上でのマッハ5(ただし、サンタが飛んでいる高さ38,000ftsだとマッハ数はもっと高く出る)です。世界最速の飛行機であるロッキードSR-71ブラックバードでさえマッハ3.3といわれているので、サンタさんバチクソ速いですね。
- 2021年: マッハ2
- 2022年: マッハ1.3
- 2023年: マッハ5
推測ですが24日、25日で北極から世界一周してまた北極へ行くために、緯度、経度は対地速度に関係なく適当に変えているんじゃないか?という気がしてきました。別の時間に測ったら全然違う速度になってませんかね?面倒なので検証しませんけど……。来年の速度も気になります。覚えていたらまた計算してみましょう。
コメント一覧
- コメントはありません。
 この記事にコメントする
2023年12月23日
コメント一覧
- コメントはありません。
 この記事にコメントする
2023年12月21日
Twitterのトラブル
昼頃だったか?Twitterで何かトラブルが起きていたらしくて、初ログインしたときのような画面になっていました。
Twitterの使い始めがどんな画面だったか全く覚えていませんが、たぶんこんな画面なんでしょう。今だと別アカウントを登録しない限り、見る機会がない画面でしょうね。
コメント一覧
- コメントはありません。
 この記事にコメントする
| < | 2024 | > | ||||
| << | < | 01 | > | >> | ||
| 日 | 月 | 火 | 水 | 木 | 金 | 土 |
| - | 1 | 2 | 3 | 4 | 5 | 6 |
| 7 | 8 | 9 | 10 | 11 | 12 | 13 |
| 14 | 15 | 16 | 17 | 18 | 19 | 20 |
| 21 | 22 | 23 | 24 | 25 | 26 | 27 |
| 28 | 29 | 30 | 31 | - | - | - |
最近のコメント20件
-
 25年11月28日
hdkさん (12/04 08:10)
「あれ、停止直前くらいの時のトルクコンバー...」 -
 25年11月28日
すずきさん (12/03 11:24)
「トルクコンバーターがいてエンブレは掛かり...」 -
 25年11月28日
hdkさん (12/02 08:02)
「"停止直前に急にエンブレがほぼゼロになる...」 -
 25年10月6日
すずきさん (10/10 13:14)
「ですね。ccはもはやコンパイラというより...」 -
 25年10月6日
hdkさん (10/10 08:27)
「ただのHello, worldでも試して...」 -
 25年9月29日
すずきさん (10/03 00:29)
「なんと、メタパッケージ入れてなかったです...」 -
 25年9月29日
hdkさん (10/02 06:51)
「あれ、dkmsは自動ビルドされるのが便利...」 -
 20年8月24日
すずきさん (08/30 22:06)
「ですね、自分も今はPulseAudioを...」 -
 20年8月24日
hdkさん (08/29 09:32)
「ALSA懐かしい... PulseAud...」 -
 16年2月14日
すずきさん (08/04 01:31)
「お役に立ったようでしたら幸いです。」 -
 16年2月14日
enc28j60さん (08/03 17:40)
「ちょうど詰まっていたところです。\n非常...」 -
 25年7月20日
すずきさん (07/30 00:10)
「ギクシャクするのは減速時の2速シフトダウ...」 -
 25年7月20日
hdkさん (07/29 07:38)
「2速発進でギクシャクするんですか? 面白...」 -
 25年7月20日
すずきさん (07/28 23:16)
「なるほど。レガシィB4のATはDレンジで...」 -
 25年7月20日
hdkさん (07/28 21:28)
「MT車でも1速はギクシャクするので完全に...」 -
 25年7月20日
すずきさん (07/28 00:44)
「何日か乗ってみて気づいたんですが、Dレン...」 -
 25年7月20日
hdkさん (07/22 22:59)
「2速発進って雪道モードっぽさがありますが...」 -
 20年8月16日
すずきさん (07/21 23:27)
「ありがとうございます。リアル志向が肌に合...」 -
 20年8月16日
こここさん (07/21 12:19)
「個人的でも「正直な感想」と「おすすめのハ...」 -
 20年8月16日
すずきさん (07/01 01:11)
「そうですね。残念ながら私には向いてなかっ...」
最近の記事3件
こんてんつ
 wiki
wiki Linux JM
 Java API
過去の日記
 2002年
2002年 2003年
2003年 2004年
2004年 2005年
2005年 2006年
2006年 2007年
2007年 2008年
2008年 2009年
2009年 2010年
2010年 2011年
2011年 2012年
2012年 2013年
2013年 2014年
2014年 2015年
2015年 2016年
2016年 2017年
2017年 2018年
2018年 2019年
2019年 2020年
2020年 2021年
2021年 2022年
2022年 2023年
2023年 2024年
2024年 2025年
2025年 過去日記について
その他の情報
 アクセス統計
 サーバ一覧
サーバ一覧 サイトの情報
合計:
本日:
