2025年5月14日
signalの未定義動作を見る - その2
目次: C言語とlibc
シグナルマスク(sigprocmaskのマニュアル)の「規定されていない」使い方をするとどうなるか?の続きです。5つのマルチスレッド(親スレッド+4つの子スレッド)で全員でsigwait()するのは共通で、誰がsigprocmask()を呼ぶか?を変えながら、下記4パターンを試します。
- 最初のスレッドがsigprocmask()
- 最初のスレッド「以外」の1スレッドがsigprocmask()
- 全スレッドがsigprocmask()
- 全スレッドがpthread_sigmask()
今回は結果3と4を紹介します。1〜3は定義されていない動作ですが、4は比較用に実施する「正しい方法」です。
結果3 - 全スレッドがsigprocmask()
全スレッドがsigprocmask()した場合です。ゆっくり5回シグナルを送ると、親スレッド(th 4)のsigwait()がシグナルを受け取り、子スレッド(th 0)のsigwait()はEINTRが返ります。
結果3 - シグナルが少ない場合
$ g++ -Wall -g -O2 -DUSE_SIGPROCMASK_ALL -DID_MAINTHREAD=1 signal_thread.cpp && ./a.out
Use sigprocmask
th  0: sub  (child ) thread start
th  0: sigprocmask(block)
th  1: main (child ) thread start
th  1: sigprocmask(block)
th  2: sub  (child ) thread start
th  2: sigprocmask(block)
th  4: sub  (parent) thread start
th  4: sigprocmask(block)
th  3: sub  (child ) thread start
th  3: sigprocmask(block)
th  3: loop start
th  0: loop start
th  2: loop start
th  1: loop start
th  4: loop start
th  4: got SIGUSR1
th  0: sigwait failed (Interrupted system call)
th  4: got SIGUSR1
th  0: sigwait failed (Interrupted system call)
th  4: got SIGUSR1
th  0: sigwait failed (Interrupted system call)
th  4: got SIGUSR1
th  0: sigwait failed (Interrupted system call)
th  4: got SIGUSR1
th  0: sigwait failed (Interrupted system call)
良い感じです。また結果1(親スレッドがsigprocmask())と異なり、大量にシグナルを送りつけてもabortしないのも良いです。
結果3 - シグナルが多い場合
$ g++ -Wall -g -O2 -DUSE_SIGPROCMASK_ALL -DID_MAINTHREAD=1 signal_thread.cpp && ./a.out
Use sigprocmask
th  0: sub  (child ) thread start
th  0: sigprocmask(block)
th  1: main (child ) thread start
th  1: sigprocmask(block)
th  2: sub  (child ) thread start
th  2: sigprocmask(block)
th  4: sub  (parent) thread start
th  4: sigprocmask(block)
th  3: sub  (child ) thread start
th  3: sigprocmask(block)
th  3: loop start
th  0: loop start
th  2: loop start
th  1: loop start
th  4: loop start
(...略...)
th  2: sigwait failed (Interrupted system call)
th  0: sigwait failed (Interrupted system call)
th  0: got SIGUSR1
th  1: got SIGUSR1
th  2: got SIGUSR1
th  2: got SIGUSR1
th  1: sigwait failed (Interrupted system call)
th  0: got SIGUSR1
th  4: sigwait failed (Interrupted system call)
th  3: sigwait failed (Interrupted system call)
th  2: sigwait failed (Interrupted system call)
th  1: got SIGUSR1

(別ターミナルから)
$ while :; do kill -USR1 123450; if [ $? -ne 0 ]; then break; fi; done
良さそうですね。
結果4 - 全スレッドがpthread_sigmask()
正しい方法(全スレッドがpthread_sigmask())はどんな動きでしょうか?結果だけ先に書いてしまうと、全スレッドがsigprocmask()したときと同じ動きをするようです。
結果4 - シグナルが少ない場合
$ g++ -Wall -g -O2 -DUSE_PTHREADSIGMASK -DID_MAINTHREAD=1 signal_thread.cpp && ./a.out
Use pthread_sigmask
th  0: sub  (child ) thread start
th  0: pthread_sigmask(block)
th  1: main (child ) thread start
th  1: pthread_sigmask(block)
th  2: sub  (child ) thread start
th  2: pthread_sigmask(block)
th  4: sub  (parent) thread start
th  4: pthread_sigmask(block)
th  3: sub  (child ) thread start
th  3: pthread_sigmask(block)
th  3: loop start
th  2: loop start
th  0: loop start
th  1: loop start
th  4: loop start
th  4: got SIGUSR1
th  0: sigwait failed (Interrupted system call)
th  4: got SIGUSR1
th  0: sigwait failed (Interrupted system call)
th  4: got SIGUSR1
th  0: sigwait failed (Interrupted system call)
th  4: got SIGUSR1
th  0: sigwait failed (Interrupted system call)
th  4: got SIGUSR1
th  0: sigwait failed (Interrupted system call)
結果3(全員sigprocmask())と同じ動きをしています。当然ながら、大量にシグナルを送りつけてもabortしません。
結果4 - シグナルが多い場合
$ g++ -Wall -g -O2 -DUSE_PTHREADSIGMASK -DID_MAINTHREAD=1 signal_thread.cpp && ./a.out
Use pthread_sigmask
th  0: sub  (child ) thread start
th  0: pthread_sigmask(block)
th  1: main (child ) thread start
th  1: pthread_sigmask(block)
th  2: sub  (child ) thread start
th  2: pthread_sigmask(block)
th  4: sub  (parent) thread start
th  4: pthread_sigmask(block)
th  3: sub  (child ) thread start
th  3: pthread_sigmask(block)
th  3: loop start
th  2: loop start
th  0: loop start
th  1: loop start
th  4: loop start
(...略...)
th  2: got SIGUSR1
th  0: sigwait failed (Interrupted system call)
th  1: sigwait failed (Interrupted system call)
th  4: sigwait failed (Interrupted system call)
th  0: got SIGUSR1
th  4: got SIGUSR1
th  0: got SIGUSR1
th  3: sigwait failed (Interrupted system call)
th  3: got SIGUSR1
th  2: sigwait failed (Interrupted system call)
th  2: got SIGUSR1
th  0: sigwait failed (Interrupted system call)
th  0: got SIGUSR1
th  1: sigwait failed (Interrupted system call)
th  3: sigwait failed (Interrupted system call)
th  3: got SIGUSR1
th  0: got SIGUSR1
th  4: sigwait failed (Interrupted system call)
th  2: sigwait failed (Interrupted system call)
th  1: sigwait failed (Interrupted system call)

(別ターミナルから)
$ while :; do kill -USR1 123450; if [ $? -ne 0 ]; then break; fi; done
4つの結果から推測するにpthread_sigmask()とsigprocmask()は同じシステムコールを使っているかもしれません。libcのソースコードを見ればわかるはずなので、また今度に見ようと思います。
ソースコード
こちらからどうぞ。
 ソースコード
コメント一覧
- コメントはありません。
 この記事にコメントする
2025年5月12日
signalの未定義動作を見る - その1
目次: C言語とlibc
シグナルマスクのマニュアル(sigprocmaskのマニュアル)を見ると下記のように「規定されていない」とあります。実際Linuxだとどうなるか気になります。
マルチスレッドのプロセスでsigprocmask()を使用した場合の動作は規定されていない。
実行環境は下記のとおりです。他のプラットフォームや過去/将来のバージョンのLinuxで今回の実験結果と同じ動作をするとは限りませんのでご注意ください。
- Debian Testing (trixie/sid)
- Linux 6.12.12-1
実験内容は5つのマルチスレッド(親スレッド+4つの子スレッド)で全員でsigwait()するのは共通、誰がsigprocmask()を呼ぶか?を変えながら、下記4パターンを試します。
- 最初のスレッドがsigprocmask()
- 最初のスレッド「以外」の1スレッドがsigprocmask()
- 全スレッドがsigprocmask()
- 全スレッドがpthread_sigmask()
最後のパターンはマルチスレッドでsigwait()する場合の正しい方法(全スレッドがpthread_sigmask())で、他の3つと動作を比較するためのものです。
プログラム
コードは長くなってしまったので最後にファイルへのリンクを張っておきます。
実験方法はコンパイル時にマクロを適宜切り替えて、生成された./a.outを起動し、別のターミナルからkillコマンドなどでSIGUSR1を送るだけです。
結果1 - 最初のスレッドがsigprocmask()
最初のスレッドがsigprocmask()した場合です。ゆっくり5回シグナルを送ると、親スレッド(th 4)のsigwait()がシグナルを受け取り、子スレッド(th 0)のsigwait()はEINTRが返ってきます。
結果1 - シグナルが少ない場合
$ g++ -Wall -g -O2 -DUSE_SIGPROCMASK -DID_MAINTHREAD=4 signal_thread.cpp && ./a.out
Use sigprocmask
th  0: sub  (child ) thread start
th  1: sub  (child ) thread start
th  2: sub  (child ) thread start
th  4: main (parent) thread start
th  4: sigprocmask(block)
th  3: sub  (child ) thread start
th  3: loop start
th  2: loop start
th  4: loop start
th  0: loop start
th  1: loop start
th  4: got SIGUSR1
th  0: sigwait failed (Interrupted system call)
th  4: got SIGUSR1
th  0: sigwait failed (Interrupted system call)
th  4: got SIGUSR1
th  0: sigwait failed (Interrupted system call)
th  4: got SIGUSR1
th  0: sigwait failed (Interrupted system call)
th  4: got SIGUSR1
th  0: sigwait failed (Interrupted system call)
一見すると良い感じに動くように見えますが、大量にシグナルを送りつけるとabortします。ありゃりゃ。
結果1 - シグナルが多い場合
$ g++ -Wall -g -O2 -DUSE_SIGPROCMASK -DID_MAINTHREAD=4 signal_thread.cpp && ./a.out
Use sigprocmask
th  0: sub  (child ) thread start
th  1: sub  (child ) thread start
th  2: sub  (child ) thread start
th  4: main (parent) thread start
th  4: sigprocmask(block)
th  3: sub  (child ) thread start
th  3: loop start
th  1: loop start
th  0: loop start
th  2: loop start
th  4: loop start
ユーザー定義シグナル1


(別ターミナルから)
$ while :; do kill -USR1 123450; if [ $? -ne 0 ]; then break; fi; done
一見動くように見えて、だめなパターンですね。
結果2 - 最初のスレッド「以外」の1スレッドがsigprocmask()
最初のスレッド「以外」の1スレッドがsigprocmask()した場合です。1回シグナルを送っただけでabortしました。
結果2 - シグナルが少ない場合
$ g++ -Wall -g -O2 -DUSE_SIGPROCMASK -DID_MAINTHREAD=0 signal_thread.cpp && ./a.out
Use sigprocmask
th  0: main (child ) thread start
th  0: sigprocmask(block)
th  1: sub  (child ) thread start
th  2: sub  (child ) thread start
th  4: sub  (parent) thread start
th  3: sub  (child ) thread start
th  3: loop start
th  0: loop start
th  2: loop start
th  1: loop start
th  4: loop start
ユーザー定義シグナル1
結果1の動きを見る限り納得の結果と言えるでしょう。シグナルは常に親スレッドにも飛んでいたので、シグナルをマスクしてない親スレッドはabortするのはそりゃそうだなと思います。
続きはまた今度やります。
ソースコード
こちらからどうぞ。
コメント一覧
- コメントはありません。
この記事にコメントする
2025年5月9日
JavaとM5Stamp C3とBluetooth LE - Bluetoothデバイスとの通信改善
目次: Arduino
M5Stamp C3 + Raspberry Piを組み合わせて作った的あてゲーム、秋葉原のTarget-1(お店のサイト)で壊れることなく1年ほど安定稼働しているようです。良かった良かった。しかし最近、故障ではないもののタイトル画面に戻ってしまう頻度が増えているそうです。
以前に日記で紹介したとおり、的あてゲームのシステムはM5Stamp C3をBluetooth LEデバイスにして、Linux PCもしくはRaspberry PiなどのLinux SBCと通信しています。Bluetoothの接続が切れるとタイトル画面に戻って再接続する実装にしていますので、不意にタイトル画面に戻る = Bluetoothの接続が切断されていることを意味します。
原因の仮説と対策
お店での運用を見ていると、ゲームリザルト画面で放置されることが多いです。今の実装ではリザルト画面でBluetoothの通信を一切行いません。あまりにも長い間通信しないとBluetooth接続が切れてしまう?のかもしれません。
とりあえず今回は小手先の対処として、リザルト画面でM5Stamp C3本体のLEDを点滅させる指令を送り続け、Bluetooth接続を維持するようにしました。家でテストしてみたところ1日以上放置しても接続を維持できています。
代償として消費電力が0.1Wくらい増えますが、何度もタイトル画面に戻されるよりはマシでしょう……。
目指すは先代の実績?
先代のTSS(ターゲットシューティングシステム、作者さんの紹介サイト)は5年位稼働していたらしい(すごい!)ので、追いつくにはあと4年ですか、長いな〜……。
4年後を考えてみると、Linux側のマシンROCK 3Cはほぼ確実にEOL(End Of Life、生産終了、販売終了)だと思います。Linux側のシステムはHW依存は少ないし、SWも枯れたやつが多いので、そのとき販売されているお買い得なARM SBCボード(Raspberry Pi 6とか7とか?ROCK 3C後継のボードとか)への乗り換えは容易だと思います。
困るのはM5Stamp C3ですね。EOLになると別ボードへのSW移植とドッキングするためのボード再設計が必要でしょう。M5Stampは安くて良いんですけど、世代ごとに形がガンガン変わって互換性ゼロなのが良くない点ですね。作り直すとしたら、今のM5Stamp C3の2枚使い設計はダサいので、I/Oピン数の多いボード1枚に改めると思います。
コメント一覧
- コメントはありません。
この記事にコメントする
2025年5月5日
timespecの操作関数
目次: C言語とlibc
POSIXには時間を表す構造体が2つあります。マイクロ秒単位のstruct timevalと、ナノ秒単位のstruct timespecです。struct timespecの方が後発なのか、比較的新しいAPIはstruct timespecを使う傾向にありますが、基本的には混在しています。
timevalとtimespec
struct timeval {
    time_t      tv_sec;     /* 秒 */
    suseconds_t tv_usec;    /* マイクロ秒 */
};

struct timespec {
    time_t tv_sec;     /* 秒 */
    long   tv_nsec;    /* ナノ秒 */
};
見てのとおり構造体ですから、足し算や引き算をするにも桁上がりを考える必要があって一苦労必要かと思いきや、POSIXはtimeradd/timersubなどのマクロを用意しており、struct timevalの加減算と比較などが比較的簡単に行えます。便利ですね。
ではstruct timespecにも同様にtimespecadd/timespecsubがあると思いますよね?ところが一部のlibc(BSD系やnewlib)以外は実装していません。なぜ……!?
timeraddのtimespec版
#define timespecadd(a, b, res)					\
	do {							\
		(res)->tv_sec = (a)->tv_sec + (b)->tv_sec;	\
		(res)->tv_nsec = (a)->tv_nsec + (b)->tv_nsec;	\
		if ((res)->tv_nsec >= 1000000000) {		\
			(res)->tv_sec++;			\
			(res)->tv_nsec -= 1000000000;		\
		}						\
	} while (0)
#define timespecsub(a, b, res)					\
	do {							\
		(res)->tv_sec = (a)->tv_sec - (b)->tv_sec;	\
		(res)->tv_nsec = (a)->tv_nsec - (b)->tv_nsec;	\
		if ((res)->tv_nsec < 0) {			\
			(res)->tv_sec--;			\
			(res)->tv_nsec += 1000000000;		\
		}						\
	} while (0)
#define timespecclear(tsp)    ((tsp)->tv_sec = (tsp)->tv_nsec = 0)
#define timespecisset(tsp)    ((tsp)->tv_sec || (tsp)->tv_nsec)
#define timespeccmp(a, b, cmp)					\
	(((a)->tv_sec == (b)->tv_sec) ?				\
		((a)->tv_nsec cmp (b)->tv_nsec) :		\
		((a)->tv_sec cmp (b)->tv_sec))
いつもstruct timespecを要求するAPIを使うたびにtimespecadd/timespecsubがなくて演算しづらさにイライラするので、コピペで使い回せるように実装例をメモしておきます。この程度なら誰が書いてもほとんど同じコードになると思いますが、気になる方のためにもし著作権が発生する場合はBSD 3条項ライセンス扱いでお願いします。
コメント一覧
- コメントはありません。
この記事にコメントする
2025年5月1日
首都高バトルSteam版、フルチューン後の姿 - その3
目次: ゲーム
首都高バトル(Steam版)高ランクの車をひたすらフルチューンするやつの続きです。前回と合わせて8車種ほどフルチューンしました。もう飽きました。
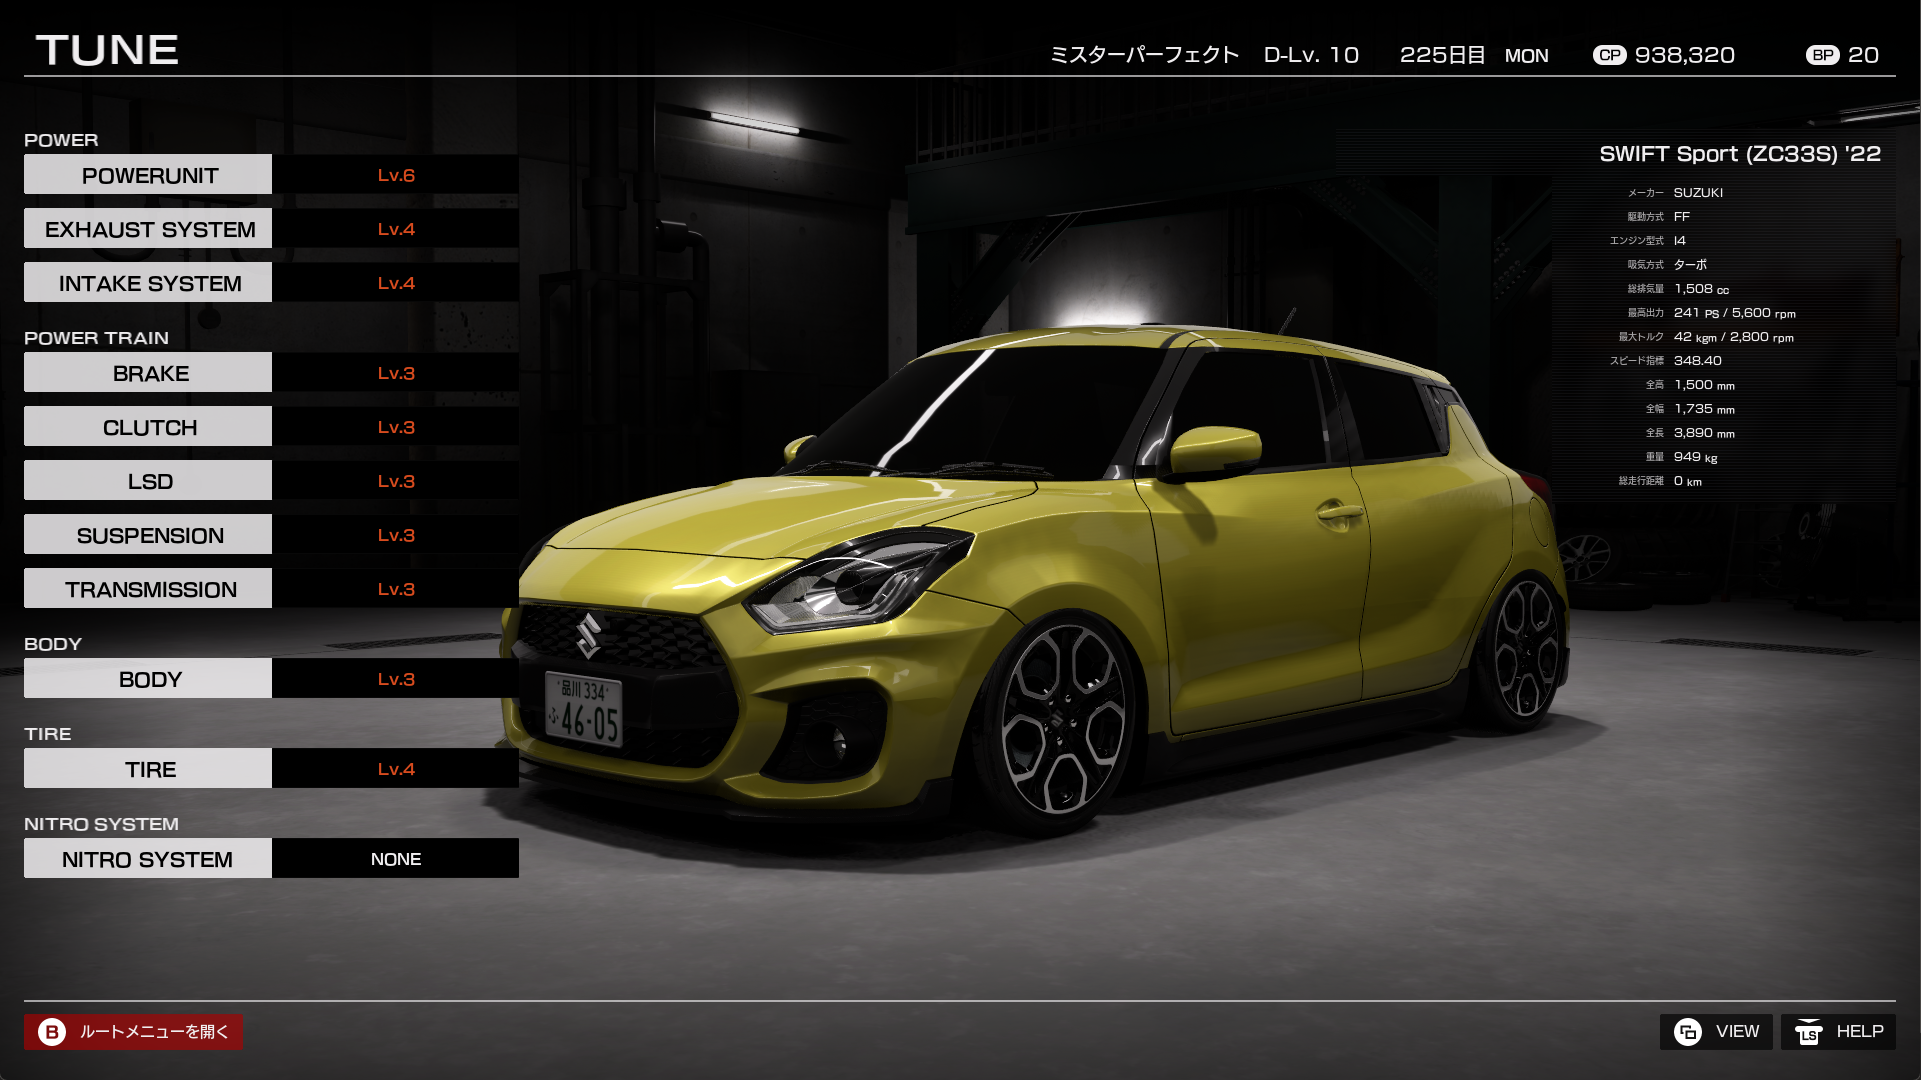
SUZUKI SWIFT Sport(ZC33S)フルチューン
検索用にフルチューン後の主要パラメータを書いておきます。ちなみにスピード指標はギア比を最高速重視にすると高い数値になるので、参考程度です。
| 車種 | 最高出力 | 最大トルク | スピード指標 | 重量 |
|---|---|---|---|---|
| SWIFT Sport(ZC33S) '22 | 241PS/5,600rpm | 42kg/2,800rpm | 348.40 | 949kg |
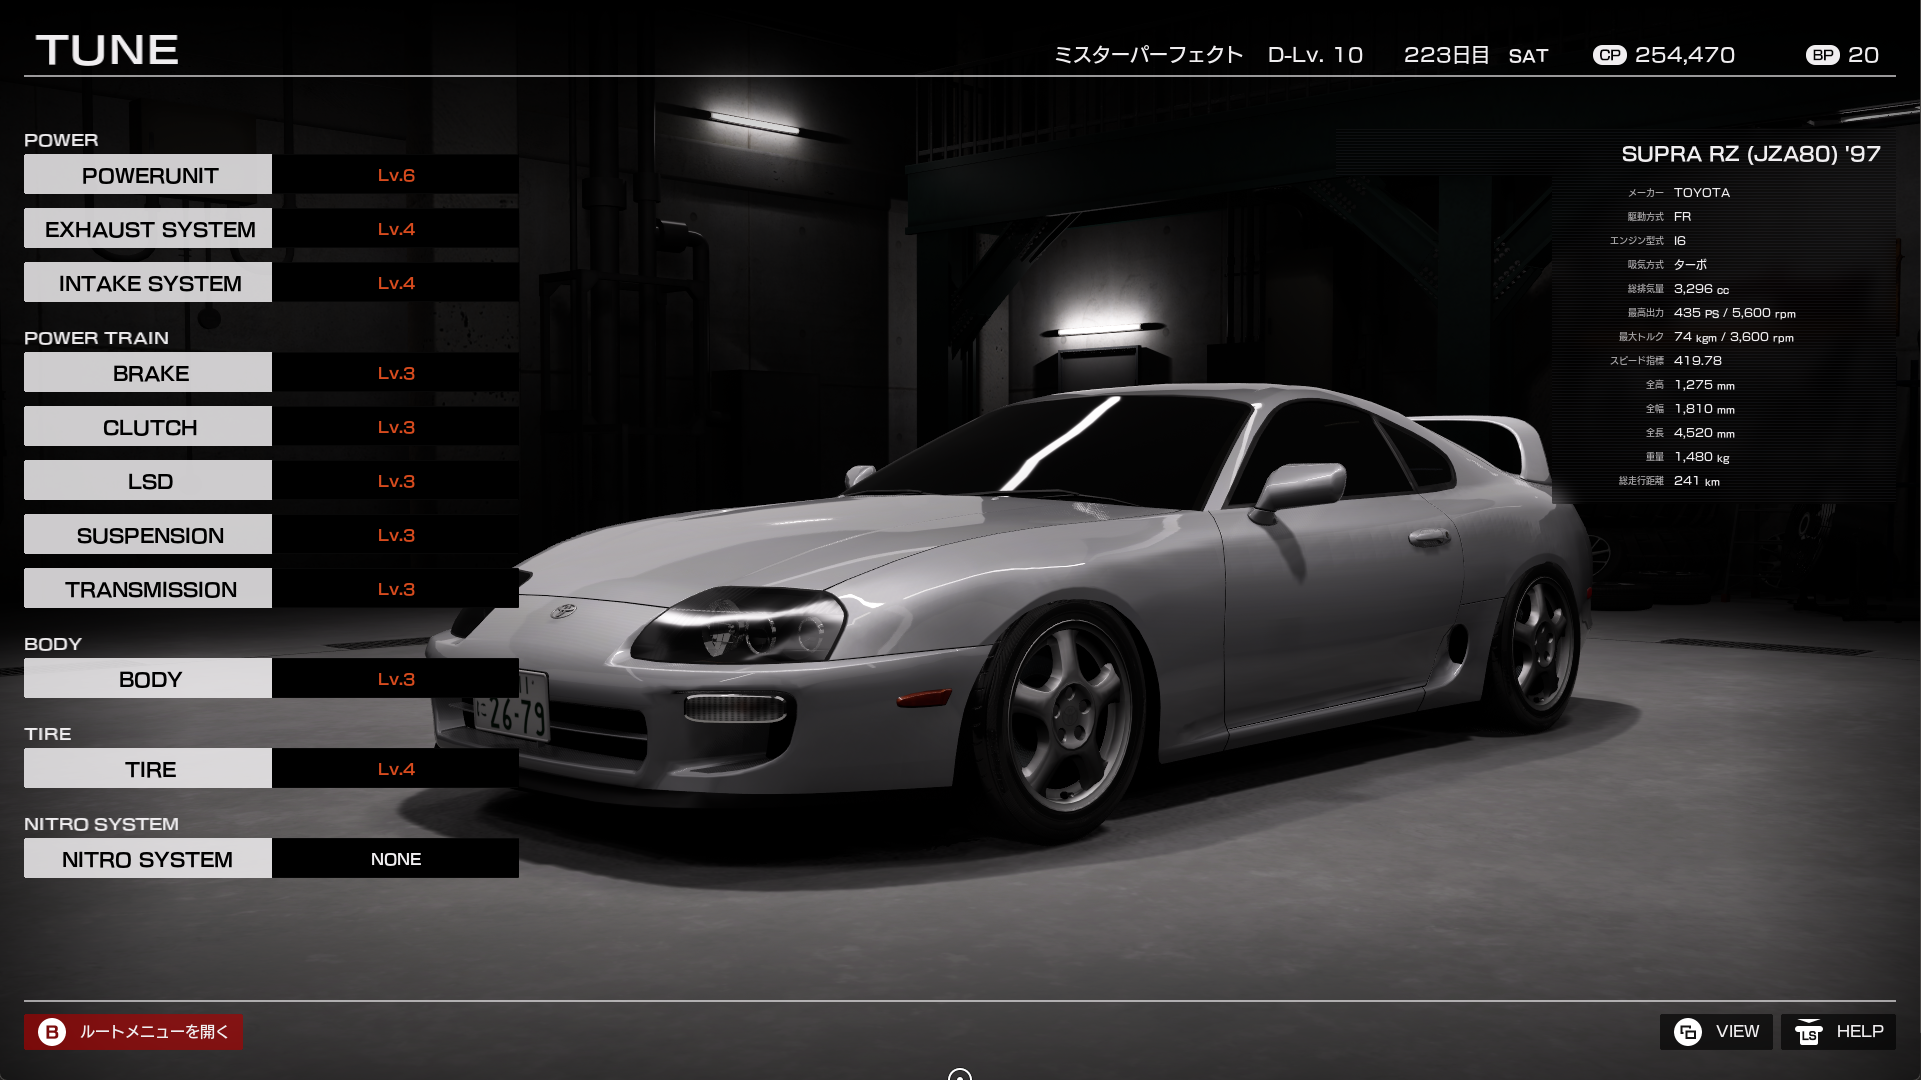
| SUPRA RZ(JZA80) '97 | 435PS/5,600rpm | 74kg/3,600rpm | 419.78 | 1,480kg |
あとはインプレッサのどれかをフルチューンするかもなあくらいですが、あまり気力が沸きません。
ローダウンの謎
アップデート前は車高は下げれば下げるほどカーブが速くなる謎システムでしたが、アップデート後は限界まで車高を下げるとストレートで地面と擦って火花が出る&逆に遅くなる変更が入ったそうです。キャプチャでは5段階のうち4まで下げた状態で撮っています。個人的には見た目は3か2くらいが一番バランスが良いですね。
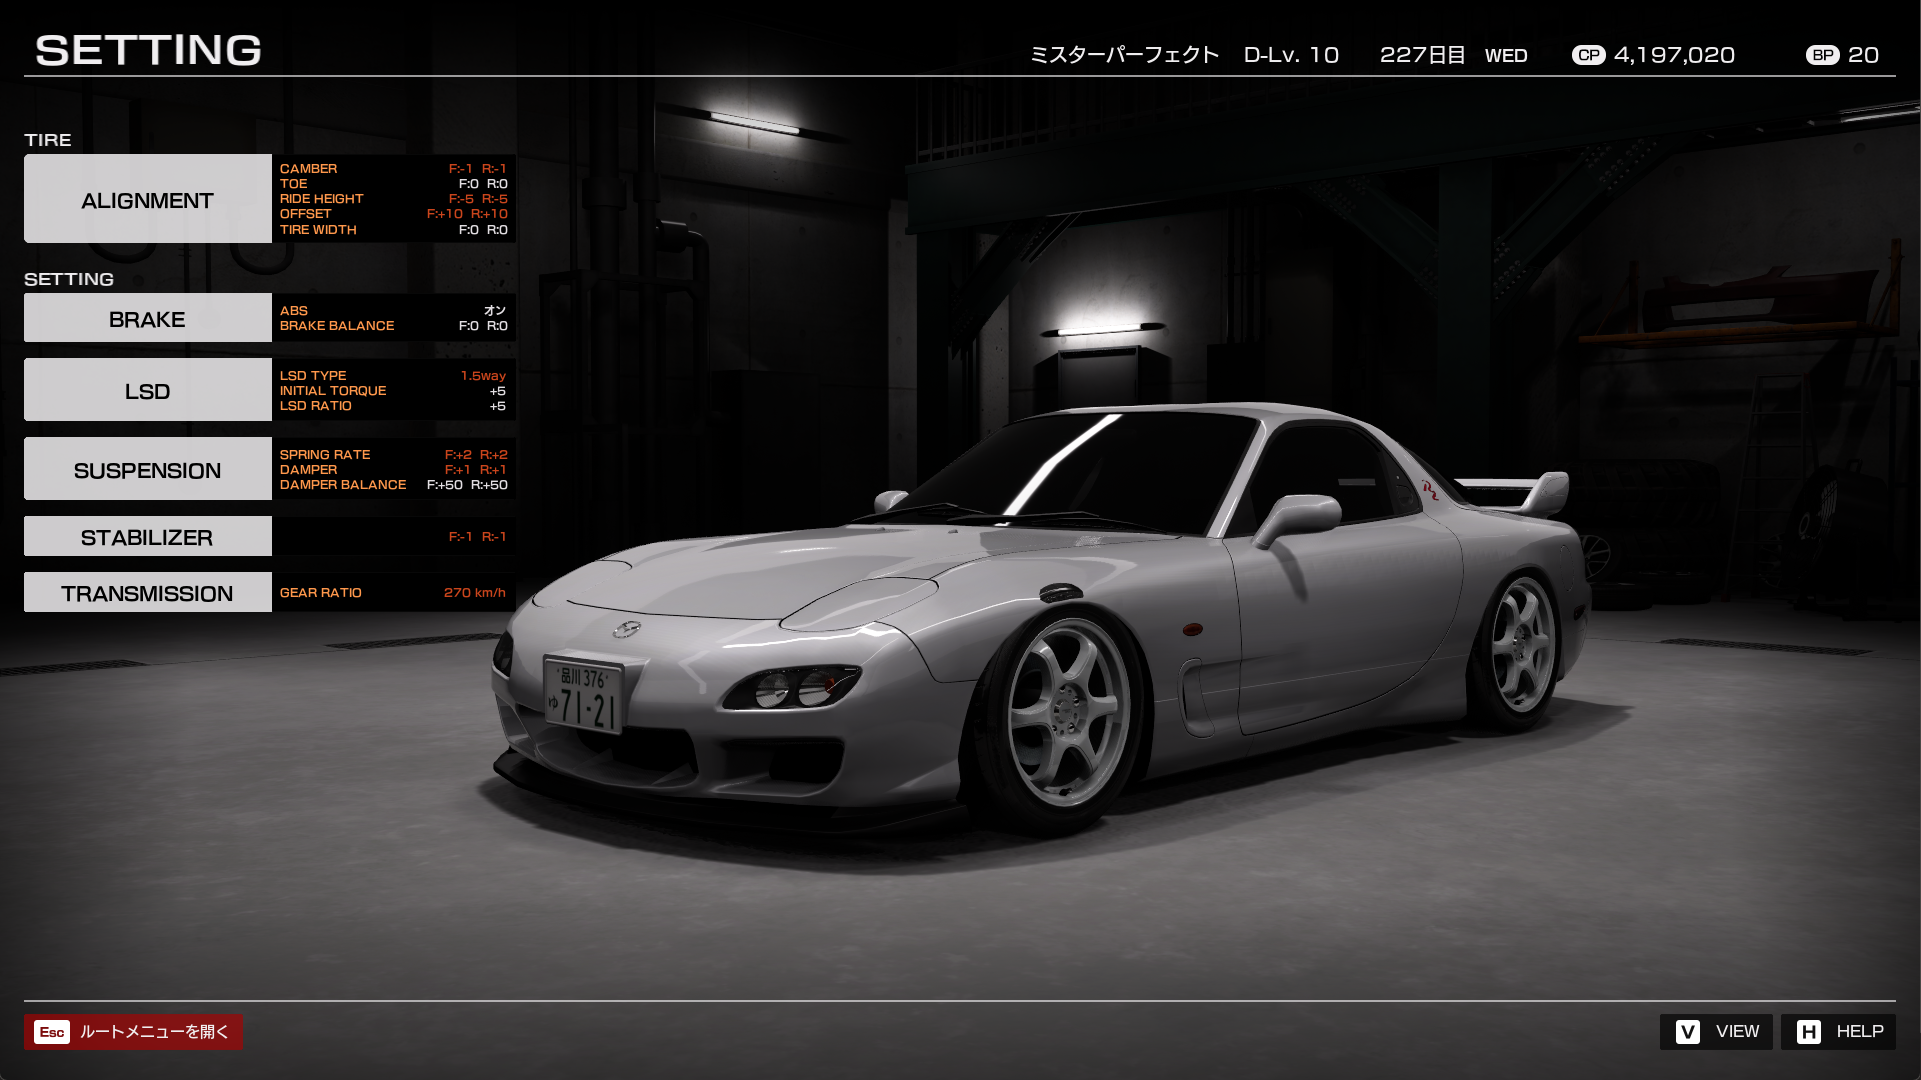
5まで下げるとおかしなことが起きる車もあって、RX-7はフロントを限界まで下げるとタイヤがフェンダーを貫通して変な表示になります……。
コメント一覧
- コメントはありません。
この記事にコメントする
| < | 2025 | > | ||||
| << | < | 05 | > | >> | ||
| 日 | 月 | 火 | 水 | 木 | 金 | 土 |
| - | - | - | - | 1 | 2 | 3 |
| 4 | 5 | 6 | 7 | 8 | 9 | 10 |
| 11 | 12 | 13 | 14 | 15 | 16 | 17 |
| 18 | 19 | 20 | 21 | 22 | 23 | 24 |
| 25 | 26 | 27 | 28 | 29 | 30 | 31 |
最近のコメント5件
最近の記事20件
-
 26年2月23日
すずき (02/27 03:32)
「[ドラクエ1リメイク、トロフィーコンプ] 目次: ゲームSteamでドラクエ1&2 HDリメイクを購入したまま完全放置でドラク...」 -
21年12月28日
すずき (02/27 03:27)
「[ゲーム - まとめリンク] 目次: ゲームNintendo DSを買ったパネルでポンDS最近の朝はパネポンDS聖剣伝説DSチ...」 -
26年2月15日
すずき (02/27 01:50)
「[ドラクエ3リメイク、トロフィーコンプ] 目次: ゲームSteamでドラクエ1&2 HDリメイクを購入したのですが、完全にほっ...」 -
26年2月11日
すずき (02/14 13:38)
「[shebangの役割 - シェル側] 目次: Linux前回(2026年1月29日の日記参照)、スクリプトの先頭(例えばシェ...」 -
23年4月10日
すずき (02/14 03:04)
「[Linux - まとめリンク] 目次: Linuxカーネル、ドライバ関連。Linux kernel 2.4 for ARMが...」 -
23年5月15日
すずき (02/09 22:27)
「[車 - まとめリンク] 目次: 車三菱 FTO GPX '95の話。群馬県へのドライブ1群馬県へのドライブ2将来車を買い替え...」 -
26年2月8日
すずき (02/09 22:27)
「[車の修理……のはずが雪] 目次: 車以前(2025年11月21日の日記参照)、ジャガーさんの左前...」 -
26年2月9日
すずき (02/09 22:10)
「[SSLに対応 - Let's Encrypt] 目次: 自宅サーバー一昨年(2024年2月2日の日記参照)にJPRSドメイン...」 -
23年6月1日
すずき (02/09 22:09)
「[自宅サーバー - まとめリンク] 目次: 自宅サーバーこの日記システム、Wikiの話。カウンターをPerlからPHPに移植日...」 -
24年2月2日
すずき (02/09 22:09)
「[SSLに対応 - JPRSドメイン認証型SSL] 目次: 自宅サーバー今更感がありますが、このサイトもSSL対応にしました。...」 -
26年2月1日
すずき (02/02 23:17)
「[エンジン出力特性は三者三様] 目次: 車Automobile Catalogue(リンク)という素敵なサイトがありまして、各...」 -
21年5月7日
すずき (02/02 19:31)
「[LLVM - まとめリンク] 目次: LLVM一覧が欲しくなったので作りました。LLVMの本を買ったClangのmain関数...」 -
26年1月19日
すずき (02/02 19:31)
「[LLVMインストール] 目次: LLVMLLVMの公式サイト(リンク)にある手順そのものなんですけど、いつもググっていて面倒...」 -
26年1月29日
すずき (02/02 19:22)
「[shebangの役割 - カーネル側] 目次: Linux前回(2026年1月23日の日記参照)はshebang(ファイル先...」 -
26年1月23日
すずき (01/27 02:47)
「[shebangの役割] 目次: Linuxスクリプトの先頭(例えばシェルスクリプトなど)に書く"#!〜"から始まるおまじない...」 -
26年1月21日
すずき (01/22 02:55)
「[日本のテレビメーカーの衰退] ソニーがテレビ事業を分離するニュース(ソニーはなぜ、テレビ事業を「分離」するのか - 中国TC...」 -
25年12月26日
すずき (12/30 14:01)
「[Linuxのjournal操作メモ] 目次: Linux最近のLinuxディストリビューションはsystemdを採用している...」 -
25年12月22日
すずき (12/28 23:39)
「[ゲームを買ったら遊びましょう3] 目次: ゲーム前回の振り返り(2024年10月20日の日記参照)から1年経ちました。所持し...」 -
08年3月25日
すずき (12/24 22:16)
「[シムシティDS2クリア] 目次: ゲームシムシティDS2のチャレンジモード「現代 温暖化」編をクリアして、スタッフロールを拝...」 -
25年12月10日
すずき (12/24 01:02)
「[LinuxからBIOS/UEFIの設定を取得する] 目次: Linux設定によって何か動作を変えたい、PC再起動するのが嫌な...」
こんてんつ
wiki Linux JM Java API過去の日記
2002年 2003年 2004年 2005年 2006年 2007年 2008年 2009年 2010年 2011年 2012年 2013年 2014年 2015年 2016年 2017年 2018年 2019年 2020年 2021年 2022年 2023年 2024年 2025年 2026年 過去日記についてその他の情報
アクセス統計 サーバ一覧 サイトの情報
合計:
本日:
